
Last December, I was in full holiday panic mode. I had volunteered to bring dessert to our neighborhood Christmas party, completely forgetting I’d also signed up to help with the school bake sale the same week. With time running out and my kitchen looking like a flour bomb had exploded, I remembered my grandmother’s foolproof recipe for 7-layer bars. These magical bars saved me that hectic week, and they’ve been my go-to holiday dessert ever since.
What makes 7-layer bars so brilliant is their simplicity—you literally just layer ingredients in a pan, bake, and you’re done. No mixers, no complicated techniques, just pure, delicious magic. Also known as magic bars or Hello Dolly bars, these treats feature a buttery graham cracker crust topped with chocolate chips, butterscotch chips, shredded coconut, chopped pecans, all bound together with sweetened condensed milk. The result? A rich, gooey, impossibly delicious dessert that looks like you spent hours in the kitchen when you actually spent about 10 minutes on prep.
Why 7-Layer Bars Are the Perfect Holiday Dessert
The genius of 7-layer bars lies in their versatility and crowd-pleasing appeal. Everyone finds something to love in these bars—chocolate lovers adore the chips, coconut fans appreciate those sweet flakes, and nut enthusiasts go crazy for the crunchy pecans. They’re sturdy enough to transport to parties, beautiful enough to gift, and delicious enough that people will ask for the recipe every single time.
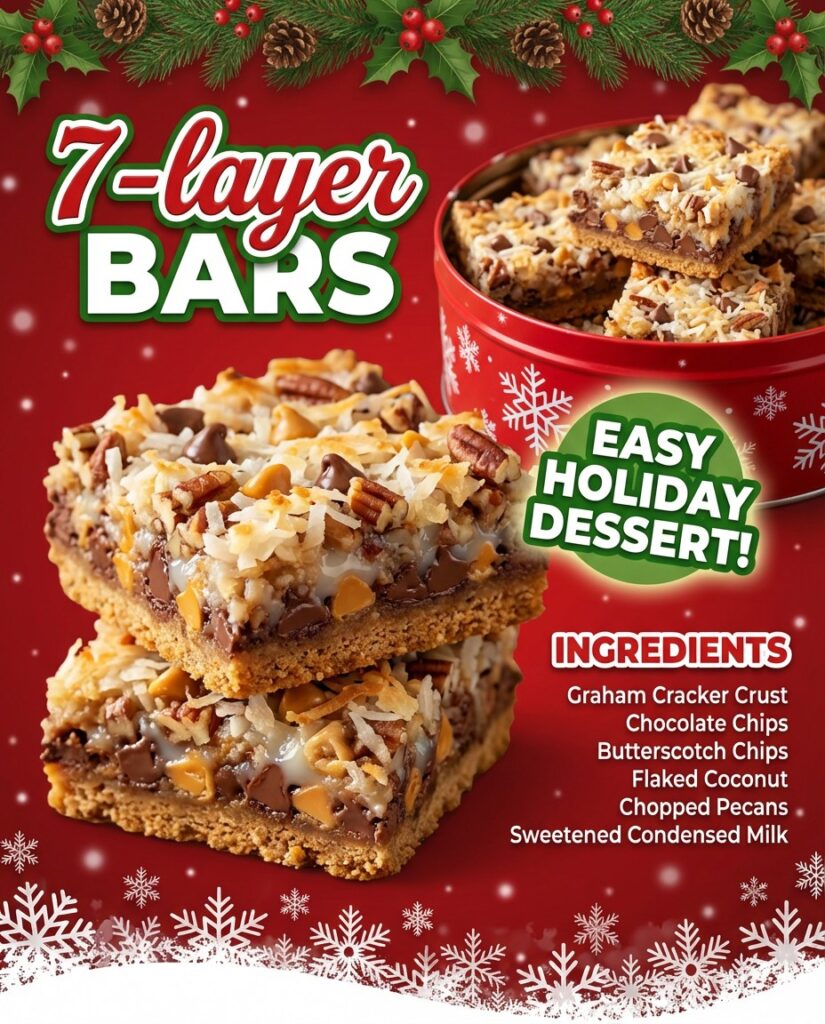
Looking at the festive image of these 7-layer bars, you can see exactly what makes them so visually stunning. Against a beautiful red holiday background decorated with pine branches, pinecones, and holly berries, there’s a stack of three perfectly cut bars in the foreground and more bars displayed in a festive red tin decorated with snowflakes. Each bar showcases those gorgeous layers—the golden graham cracker base, the melted chocolate and butterscotch chips creating a rich middle layer, and the top covered with toasted coconut and pecans that have caramelized beautifully during baking. The cross-section view reveals how all seven layers meld together into one cohesive, decadent treat. Snowflakes drift across the scene, making these 7-layer bars look like the perfect addition to any holiday dessert table.
Ingredients for Classic 7-Layer Bars
For the Graham Cracker Crust:
- 2 cups graham cracker crumbs (about 15 full sheets)
- ½ cup unsalted butter, melted
- ¼ cup granulated sugar
For the Layers:
- 1½ cups semi-sweet chocolate chips
- 1½ cups butterscotch chips
- 1½ cups sweetened shredded coconut
- 1½ cups chopped pecans
- 1 (14-ounce) can sweetened condensed milk
Step-by-Step Instructions for Perfect 7-Layer Bars
Preparing Your Pan and Graham Cracker Crust
Start by preheating your oven to 350°F. Line a 9×13-inch baking pan with parchment paper, leaving an overhang on two sides—this makes removing and cutting your 7-layer bars so much easier later. You can also use aluminum foil sprayed with cooking spray if you don’t have parchment.
To make the graham cracker crust for your 7-layer bars, you’ll need finely crushed graham crackers. You can crush them in a food processor, or place them in a sealed plastic bag and crush them with a rolling pin—a great stress reliever during busy holiday baking! In a medium bowl, combine the graham cracker crumbs, melted butter, and sugar, stirring until the mixture resembles wet sand and holds together when pressed.
Press this mixture firmly and evenly into the bottom of your prepared pan. Use the bottom of a measuring cup or glass to really pack it down—a firm crust is essential for 7-layer bars that hold together when cut. Pre-bake the crust for 8-10 minutes until it’s just beginning to turn golden and smells wonderfully toasty. This step helps create a sturdy base that won’t get soggy.
Layering Your 7-Layer Bars Ingredients
Here’s where the magic happens with 7-layer bars—the layering process is incredibly satisfying and so simple. Once your crust has pre-baked, remove the pan from the oven and work quickly while it’s still hot.
Start by sprinkling the chocolate chips evenly over the hot crust. Follow immediately with the butterscotch chips, spreading them evenly across the chocolate chips. The heat from the crust will start melting the bottom layer of chips, which helps everything stick together beautifully.
Next, sprinkle the sweetened shredded coconut evenly over the chips. Then add the chopped pecans, distributing them as evenly as possible across the surface. Don’t stress about perfection—these 7-layer bars are meant to be rustic and homey.
Now for the most crucial step: take your can of sweetened condensed milk and drizzle it slowly and evenly over the entire surface. Start from one corner and move in a zigzag pattern, making sure to cover as much area as possible. The sweetened condensed milk will seep down through all the layers, binding everything together and creating that signature gooey texture of 7-layer bars. You might think you need to spread it, but don’t—just let it naturally settle and work its magic during baking.
Baking Your 7-Layer Bars to Golden Perfection
Return the pan to your 350°F oven and bake for 25-30 minutes. You’ll know your 7-layer bars are done when the edges are golden brown and bubbly, and the coconut on top has toasted to a beautiful light golden color. The center might still look slightly soft, but it will firm up as the bars cool.
This is important: do not overbake! Overbaked 7-layer bars become hard and difficult to cut. It’s better to err on the side of slightly underdone, as they’ll continue cooking from residual heat once removed from the oven.
Remove the pan from the oven and let the 7-layer bars cool completely in the pan on a wire rack. This takes about 2 hours, and I know it’s torture to wait, but cutting them while warm will result in a gooey mess. For the cleanest cuts, I actually refrigerate my 7-layer bars for at least 1 hour before cutting—they slice beautifully when chilled.
Cutting and Serving Perfect 7-Layer Bars
Once your 7-layer bars are completely cool or chilled, use the parchment paper overhang to lift the entire slab out of the pan. Place it on a cutting board. For the cleanest cuts, use a large, sharp knife and wipe it clean with a damp towel between each cut.
Cut your 7-layer bars into squares—I typically get about 24 bars from a 9×13 pan, but you can cut them larger or smaller depending on your needs. These bars are rich, so smaller pieces are actually quite satisfying.
Nutritional Information for 7-Layer Bars
Per serving (1 bar, based on 24 bars):
- Calories: 285
- Total Fat: 16g
- Saturated Fat: 8g
- Trans Fat: 0g
- Cholesterol: 15mg
- Sodium: 95mg
- Total Carbohydrates: 35g
- Dietary Fiber: 2g
- Sugars: 28g
- Added Sugars: 24g
- Protein: 4g
- Vitamin D: 0.1mcg
- Calcium: 68mg
- Iron: 1mg
- Potassium: 145mg
These 7-layer bars are definitely an indulgent treat, perfect for special occasions and holiday celebrations. The nutritional values are estimates based on standard ingredients.
Serving and Presentation Tips for 7-Layer Bars
The beauty of 7-layer bars is that they’re naturally photogenic. For holiday gift-giving, arrange them in decorative tins lined with festive tissue paper or parchment. You can also package individual bars in clear cellophane bags tied with ribbon for party favors or bake sale items.
For serving at parties, arrange your 7-layer bars on a festive platter or tiered dessert stand. The different textures and colors make them visually interesting, and they look especially beautiful during the holidays when displayed alongside other cookies and treats.
These 7-layer bars are perfect at room temperature, but some people (myself included) love them slightly chilled from the refrigerator. The texture becomes a bit firmer and the flavors intensify when cold. Try both ways and see which you prefer!
If you’re bringing 7-layer bars to a potluck or party, they transport beautifully. Just keep them in the pan covered with foil, or pre-cut them and arrange in a single layer in a container. They stack reasonably well if you place parchment paper between layers.
Perfect Pairings with 7-Layer Bars
When it comes to beverages, 7-layer bars pair wonderfully with:
Coffee: A strong cup of coffee is the classic pairing. The bitterness balances the sweetness of the sweetened condensed milk and chocolate in these 7-layer bars perfectly. Try it with a hazelnut or caramel-flavored coffee during the holidays.
Hot chocolate: For an extra-indulgent treat, serve 7-layer bars with rich hot chocolate topped with marshmallows. It’s pure comfort food.
Cold milk: The traditional choice that never fails. The creamy milk cuts through the richness beautifully.
Tea: Earl Grey or English breakfast tea with a splash of cream complements the butterscotch and coconut flavors in 7-layer bars wonderfully.
For holiday entertaining, create a dessert spread that includes 7-layer bars alongside sugar cookies, gingerbread, and peppermint bark for variety. The different flavors and textures give guests options while keeping everything festive.
Recipe Variations and Substitutions for 7-Layer Bars
One of the best things about 7-layer bars is how endlessly customizable they are. Here are some variations I’ve tried and loved:
Chocolate lovers’ 7-layer bars: Replace the butterscotch chips with dark chocolate chips or white chocolate chips for a different flavor profile.
Tropical 7-layer bars: Add 1 cup of dried pineapple chunks and use macadamia nuts instead of pecans for a Hawaiian-inspired version.
Peanut butter 7-layer bars: Replace the butterscotch chips with peanut butter chips and use chopped peanuts instead of pecans.
Mint chocolate 7-layer bars: Use mint chocolate chips and add ½ teaspoon peppermint extract to the graham cracker crust for a holiday twist.
Nut-free 7-layer bars: Simply omit the pecans and add more coconut or chocolate chips. You can also add toffee bits or crushed pretzels for crunch.
Gluten-free 7-layer bars: Use gluten-free graham crackers for the crust—the rest of the ingredients are naturally gluten-free.
Salted caramel 7-layer bars: Drizzle caramel sauce over the top after baking and sprinkle with flaky sea salt for a sweet-salty combination.
White chocolate raspberry 7-layer bars: Use white chocolate chips, add dried raspberries, and use almonds instead of pecans.
Notes and Tips for 7-Layer Bars Success
After years of making 7-layer bars, here are my most important tips for perfect results:
- Don’t skip pre-baking the crust: This step ensures a firm base that won’t get soggy from the sweetened condensed milk.
- Pack the crust firmly: Use the bottom of a measuring cup to really press it down. A loose crust leads to crumbly 7-layer bars.
- Distribute layers evenly: Try to spread each ingredient evenly across the surface for consistent flavor in every bite.
- Cover all areas with sweetened condensed milk: This is the “glue” that holds everything together. Don’t leave dry spots.
- Let them cool completely: I cannot stress this enough. Hot 7-layer bars fall apart when cut. Patience is key!
- Chill before cutting: For the cleanest cuts, refrigerate for at least an hour before slicing.
- Store properly: Keep 7-layer bars in an airtight container at room temperature for up to 5 days, or refrigerate for up to 2 weeks.
- Freeze for later: These freeze beautifully! Wrap individual bars in plastic wrap and freeze for up to 3 months.
Frequently Asked Questions About 7-Layer Bars
Why are they called 7-layer bars?
The classic 7-layer bars recipe includes seven distinct layers: graham cracker crust, butter, chocolate chips, butterscotch chips, coconut, nuts, and sweetened condensed milk. Some versions count the layers slightly differently, but the name has stuck regardless!
Can I make 7-layer bars without coconut?
Absolutely! While coconut is traditional, you can replace it with additional chocolate chips, toffee bits, crushed cookies, or even dried fruit. The bars will still be delicious.
How do I prevent 7-layer bars from being too hard?
The key is not overbaking them. Remove them from the oven when the edges are golden but the center still looks slightly soft. They’ll firm up as they cool.
Can I use regular milk instead of sweetened condensed milk in 7-layer bars?
No, sweetened condensed milk is essential for this recipe. It’s very thick and sweet, and as it bakes, it binds all the layers together. Regular milk is too thin and won’t work.
Why do my 7-layer bars fall apart when I cut them?
This usually happens if they’re cut while still warm, if the crust wasn’t packed firmly enough, or if the sweetened condensed milk didn’t cover all areas. Make sure to let them cool completely (or chill them) before cutting.
Can I double the recipe for 7-layer bars?
Yes! Use two 9×13-inch pans or one large sheet pan. Keep the baking time the same but check for doneness, as a thicker layer may need a few extra minutes.
What’s the difference between 7-layer bars and magic bars?
They’re the same thing! Magic bars, 7-layer bars, and Hello Dolly bars all refer to this same delicious dessert. The name just varies by region and family tradition.
Conclusion: Your New Favorite 7-Layer Bars Recipe
There’s a reason 7-layer bars have been a beloved dessert for generations. They’re incredibly easy to make, endlessly customizable, and absolutely delicious. Whether you’re a stressed-out baker looking for a foolproof holiday dessert, a beginner wanting to impress, or an experienced cook who appreciates a low-maintenance recipe that delivers big results, these 7-layer bars are for you.
What I love most about this recipe is how it brings people together. Every time I make 7-layer bars for a gathering, they spark conversations. Someone remembers their grandmother making them, another person recalls them from childhood bake sales, and inevitably, several people ask for the recipe. These bars carry memories and create new ones with every batch.
This holiday season, give yourself the gift of stress-free baking. Make a pan of 7-layer bars, let them work their magic, and enjoy the compliments that follow. My final tip? Make two pans—one for sharing and one for hiding in the back of your fridge for late-night snacking. Trust me on this one. Happy baking, and may your holidays be as sweet as these incredible bars!