The kitchen timer was ticking down, my husband would be home in twenty minutes, and all I had was leftover chicken staring at me from the refrigerator. Little did I know that this moment of dinner desperation would lead to creating our family’s most requested cheesy garlic chicken wraps – the ultimate comfort food solution.
When Simple Ingredients Create Magic
Picture this scenario: It’s a busy Wednesday evening in my suburban Detroit kitchen, rain tapping against the windows, and I’m facing every home cook’s familiar dilemma. What do you make when you’re short on time, energy, and inspiration? That’s exactly where I found myself three years ago when I stumbled upon what would become our household’s ultimate cheesy garlic chicken wraps solution.
My grandmother always said, “The best meals come from necessity, not luxury, sweetheart.” However, I never truly understood her wisdom until that particular evening when creativity met desperation in the most delicious way possible. What started as a simple attempt to transform leftover rotisserie chicken into something special became the garlic chicken wraps recipe that changed our weeknight dinner routine forever.
These Ooey-Gooey Cheesy Garlic Chicken Wraps represent everything I love about home cooking: they’re approachable, satisfying, and create that perfect moment when the whole family gathers around the table with genuine excitement. Furthermore, these easy chicken wraps prove that extraordinary comfort food doesn’t require exotic ingredients or complicated techniques – just a little love and the right combination of flavors.
The Birth of a Family Favorite Chicken Wraps Recipe
The Accidental Discovery
As I heated my trusty cast-iron skillet – the same one my mother-in-law gave me fifteen years ago – something magical began to unfold. First, the butter started its familiar sizzle, then the minced garlic released that intoxicating aroma that transforms any kitchen into a gourmet paradise. Suddenly, my tired Wednesday kitchen felt like the warm heart of an Italian trattoria.
The transformation was remarkable. Within minutes, simple ingredients were working together to create something far greater than the sum of their parts. Moreover, when my husband walked through the door and inhaled that incredible fragrance, his expression told me everything I needed to know. “Whatever you’re making,” he said with a grin, “this is definitely going in the regular rotation.”
Why These Garlic Chicken Wraps Work for Real Life
Let’s address something important: we’re not twenty-something newlyweds anymore with endless time and energy for elaborate meal preparation. Consequently, we need recipes that deliver maximum satisfaction with minimal fuss, using ingredients we actually have on hand. Fortunately, these cheesy garlic chicken wraps check every single box for busy adults who refuse to compromise on flavor.
They take approximately twenty-five minutes from start to finish, use pantry staples you probably already own, and create enough portions for tomorrow’s lunch if any survive tonight’s dinner. Additionally, this easy chicken wraps recipe is incredibly forgiving – perfect for those evenings when precision isn’t your strong suit because life has other plans.
Understanding the Flavor Magic
The Garlic Game-Changer
Now, let’s discuss the star ingredient that elevates these wraps from good to absolutely irresistible. Over my decades of cooking, I’ve learned something crucial about garlic: raw garlic is sharp and aggressive, but properly cooked garlic becomes pure culinary gold. Specifically, the secret lies in cooking that minced garlic just until it becomes fragrant and golden – not brown, which creates bitterness.
When you sauté garlic in olive oil for precisely thirty to sixty seconds, it transforms from pungent and harsh to mellow and nutty. Subsequently, this perfectly cooked garlic infuses every piece of chicken, creating layers of flavor that make these garlic chicken wraps absolutely addictive. My neighbor Sarah, who’s been cooking for her family for over thirty years, tried this technique and called it “life-changing.”
The Strategic Cheese Combination
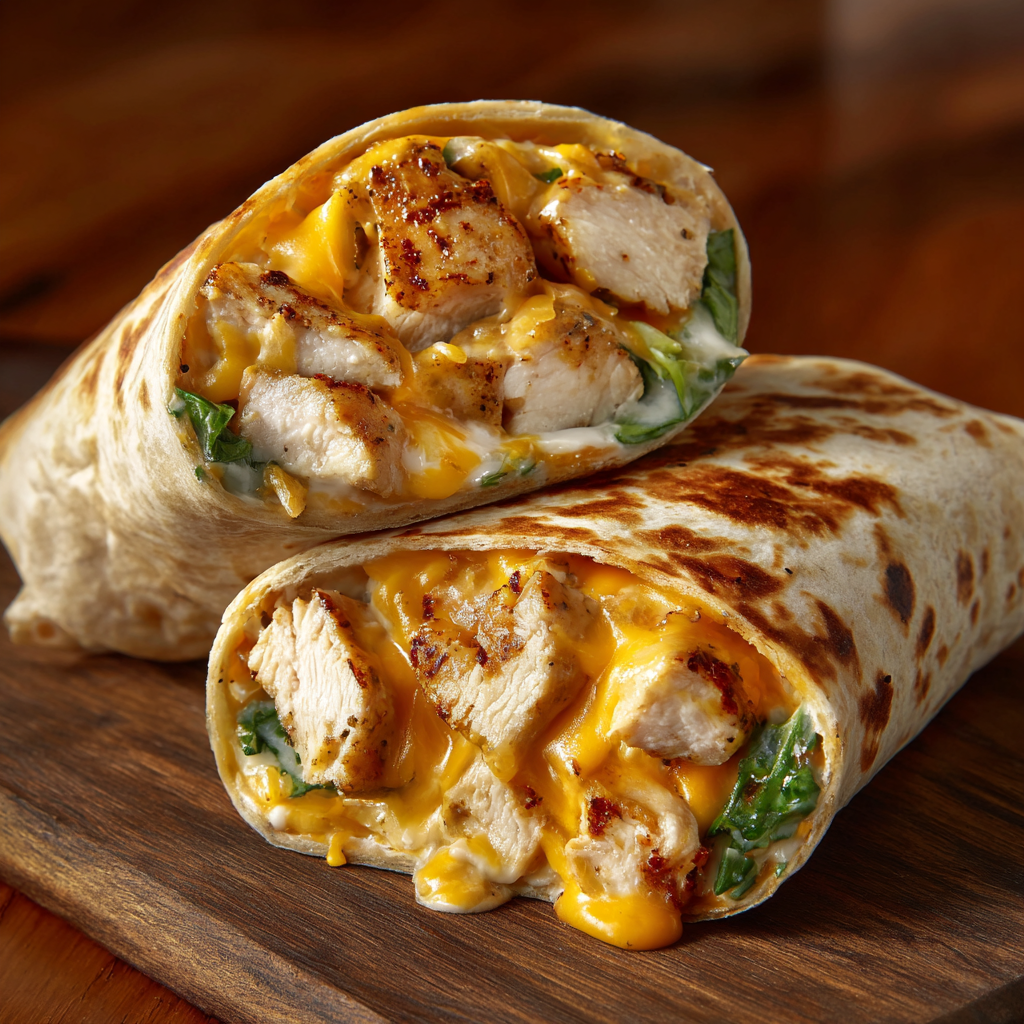
Here’s where we get serious about creating the perfect comfort food experience. Importantly, the combination of mozzarella and sharp cheddar isn’t random – it’s carefully calculated for maximum deliciousness. While the mozzarella provides that Instagram-worthy cheese pull and creamy texture, the cheddar contributes sharp, tangy flavor that prevents the wraps from becoming one-dimensional.
I discovered through trial and error that adding the cheese while the chicken is still warm from the skillet creates magic. Notably, this technique allows the cheese to begin melting before it even touches the tortilla, creating a cohesive, creamy mixture that holds together beautifully during cooking. Eventually, when you bite into the finished cheesy chicken wraps, you experience that perfect contrast: crispy, golden exterior yielding to molten, gooey center packed with flavor.
Essential Ingredients for Perfect Cheesy Garlic Chicken Wraps
What You’ll Need for These Homemade Chicken Wraps
For the incredible filling:
- 2 cups cooked chicken breast, diced into bite-sized pieces
- 4 fresh garlic cloves, minced fine
- 1 tablespoon extra-virgin olive oil
- 1 cup shredded mozzarella cheese
- 1 cup shredded sharp cheddar cheese
- Salt and freshly ground black pepper to taste
For perfect assembly:
- 4 large flour tortillas (burrito-size works best)
- 1 tablespoon butter for golden perfection
- Fresh parsley for garnish (optional but recommended)

Smart Ingredient Tips
The beauty of this cheesy garlic chicken wraps recipe lies in its flexibility and accessibility. Use rotisserie chicken from the grocery store to save precious time, or cook several chicken breasts at once during weekend meal prep. Furthermore, you can substitute ground chicken, leftover turkey, or even pulled pork for variety in your garlic chicken wraps.
When selecting tortillas, choose the largest, freshest ones available. Meanwhile, for cheese, buy blocks and shred them yourself for superior melting quality and fresher taste compared to pre-shredded varieties.
Step-by-Step Guide to Perfect Chicken Wraps
Creating the Ultimate Cheesy Garlic Chicken Filling
Step 1: Chicken Preparation
If starting with raw chicken, season it simply with salt and pepper, then cook thoroughly using your preferred method. Pan-searing creates excellent flavor, while baking offers hands-off convenience. Once cooked and slightly cooled, dice into pieces no larger than your thumbnail for easy eating.
Step 2: The Garlic Magic
Heat olive oil in your skillet over medium heat – this temperature is crucial for success. Add minced garlic and watch carefully as it sizzles. The moment it becomes golden and incredibly fragrant (about 30-60 seconds), immediately add your diced chicken. Toss everything together so every piece gets coated with that aromatic garlic oil, then remove from heat.
Step 3: Creating the Mixture
While the chicken remains warm, stir in both types of cheese. Don’t worry if it seems like an abundance of cheese – there’s no such thing in this recipe! The residual heat will begin melting the cheese, creating a creamy, cohesive filling that’s absolutely irresistible.
Assembly and Cooking Techniques
Step 4: Wrap Assembly
Lay one tortilla flat on your work surface. Spoon a generous portion of the cheesy chicken mixture into the center, being careful not to overfill. Fold in the sides first, then roll tightly from the bottom up, keeping tension without tearing the tortilla.
Step 5: The Golden Finish
Clean your skillet and melt butter over medium heat. Place wraps seam-side down – this creates a seal that prevents filling from escaping. Cook undisturbed for 2-3 minutes until golden brown, then flip carefully and repeat. The gentle sizzling should be steady but not aggressive.
Step 6: The Perfect Rest
Let cooked wraps rest for 1-2 minutes before slicing. This allows the cheese to set slightly, preventing it from flowing out when cut. Garnish with fresh parsley if desired, then serve immediately while the exterior is crispy and the interior is molten.
Customization and Variations
Making It Your Own
Throughout the years, this recipe has evolved beautifully with our family’s changing tastes and dietary needs. For instance, when my daughter discovered her love for spicy foods during college, we began adding jalapeños and using pepper jack cheese. Later, when my husband’s doctor recommended more vegetables, I started incorporating sautéed spinach and mushrooms.
The recipe accommodates modifications gracefully. Use low-carb tortillas for those watching carbohydrates, substitute turkey for chicken, or add roasted red peppers for extra flavor. Additionally, herbs like fresh basil, oregano, or thyme create delightful variations that keep the recipe interesting.
Special Occasion Adaptations
For entertaining, I slice these wraps into pinwheel appetizers secured with colorful toothpicks – they disappear faster than I can refill the platter. During holidays, adding dried cranberries and sage creates a festive twist that guests absolutely love. Meanwhile, for casual gatherings, I set up a “wrap bar” with various fillings and let everyone customize their own.
Troubleshooting Common Challenges
Preventing Kitchen Disasters
Over the years, I’ve helped countless friends master this recipe. Here are solutions to the most common challenges:
Tortilla Tears: This typically means your tortillas are too cold or the filling is too hot. Therefore, let tortillas reach room temperature and allow the filling to cool slightly before assembly.
Cheese Leakage: Overfilling is usually the culprit. Instead, use moderate amounts of filling and ensure proper folding technique. Furthermore, that seam-side-down cooking method is essential for creating a proper seal.
Bitter Garlic: You’ve cooked the garlic too long or at excessive heat. Remember, garlic transitions from perfect to bitter within seconds, so watch carefully and keep heat at medium.

Uneven Browning: Your heat is too high. These wraps require patient, gentle cooking at medium temperature for even, golden results.
Storage and Meal Prep Solutions
Making Life Easier
These wraps are fantastic for meal preparation and busy week planning. The filling can be prepared up to two days in advance and stored in the refrigerator. Assembled (but uncooked) wraps keep well for four hours refrigerated, making them perfect for entertaining preparation.
Cooked wraps freeze beautifully for up to one month when wrapped individually in foil. To reheat, use a skillet or toaster oven to maintain that crucial crispy exterior – avoid microwaving, which creates sogginess.
Leftover Magic
Here’s something wonderful: these wraps actually improve with proper reheating. Store them wrapped in foil in the refrigerator, then warm in a skillet over medium heat for optimal texture. My husband frequently packs them for lunch, and his coworkers have become quite envious of his “gourmet” midday meals.
Nutritional Benefits and Considerations
Balanced Nutrition
Each wrap provides approximately 360 calories and 24 grams of protein, creating a satisfying meal that sustains energy throughout the afternoon. The combination of protein, healthy fats, and complex carbohydrates offers balanced nutrition that works well for active adults.
For those monitoring specific nutrients, the recipe easily adapts to various dietary needs. Use low-fat cheese for reduced calories, choose whole wheat tortillas for added fiber, or substitute olive oil for butter to eliminate dairy in the cooking process.
Health-Conscious Modifications
As we become more health-aware with age, these wraps can accommodate various dietary restrictions without sacrificing flavor. Low-sodium cheese and fresh herbs instead of salt reduce sodium content significantly. Meanwhile, adding vegetables like spinach or bell peppers increases nutritional density while enhancing flavor complexity.
Creating Food Memories
More Than Just a Recipe
Food represents far more than sustenance in our household – it’s about creating connections, sharing stories, and building memories that last for generations. These wraps have become part of our family’s story: the solution for hectic weeknights, comfort food during challenging times, and celebration food during happy moments.
Last month, my daughter called from her first apartment, feeling overwhelmed with adult responsibilities. We spent thirty minutes on video chat while she prepared these wraps, and I could hear the smile return to her voice with that first bite. “It tastes exactly like home, Mom,” she said, and my heart was full.
Building Kitchen Confidence
One of my greatest joys comes from teaching this recipe to friends and family members who claim they “can’t cook.” These wraps are exceptionally forgiving and produce impressive results that build genuine kitchen confidence. Success with this recipe often becomes the foundation for culinary adventures that follow.
Quick Reference Guide
Essential Recipe Notes
Prep Time: 15 minutes
Cook Time: 15 minutes
Total Time: 30 minutes
Servings: 4 generous wraps
Difficulty Level: Beginner-friendly
Success Tips Summary
- Use warm (not hot) chicken when mixing with cheese
- Cook garlic only until golden, never brown
- Don’t overfill tortillas during assembly
- Maintain medium heat throughout cooking
- Let wraps rest before slicing for best results

Frequently Asked Questions
Q: Can I use different cheese varieties?
A: Absolutely! While mozzarella and cheddar create optimal texture and flavor, experiment with pepper jack for heat, gouda for creaminess, or Swiss for milder taste. Maintain the same total cheese quantity for best results.
Q: What’s the best reheating method?
A: For optimal texture, reheat in a skillet over medium heat for 2-3 minutes per side, or use a toaster oven at 350°F for 5-7 minutes. Avoid microwaving, which eliminates the desirable crispy exterior.
Q: Can I make these gluten-free?
A: Certainly! Simply substitute certified gluten-free tortillas for regular ones. The filling is naturally gluten-free, making this an easy accommodation that doesn’t affect taste.
Q: How do I prevent wraps from falling apart?
A: Three essential techniques: avoid overfilling, place seam-side down initially, and allow undisturbed cooking for the full time before flipping. Patience is key to success.
Q: Is rotisserie chicken acceptable?
A: Rotisserie chicken works perfectly and saves significant time! Remove skin, dice the meat, and proceed with the recipe. The pre-seasoned meat adds extra flavor depth.
Q: What vegetables work well as additions?
A: Sautéed spinach, mushrooms, bell peppers, and onions complement the flavors beautifully. Cook them briefly with the garlic before adding chicken and cheese.
Q: How can I increase the heat level?
A: Start with red pepper flakes or diced jalapeños. For more intensity, use pepper jack cheese or add hot sauce to the filling. Remember, you can always add heat, but removing it is impossible.
Q: Are these suitable for parties?
A: They’re perfect for entertaining! Create pinwheel appetizers by slicing each wrap into 6-8 pieces and securing with toothpicks. They’re ideal for casual gatherings and game day events.
Q: Why does my garlic taste bitter?
A: Overcooked garlic becomes bitter quickly. Keep heat at medium and cook only until fragrant and golden (30-60 seconds maximum). If garlic browns, discard and start fresh.
Q: Can these be frozen successfully?
A: Yes! Cooked wraps freeze well individually wrapped in foil for up to one month. Reheat from frozen in a 350°F oven for 15-20 minutes, turning once halfway through.
Final Thoughts
After years of perfecting and sharing this recipe with family and friends, I can confidently say these Ooey-Gooey Cheesy Garlic Chicken Wraps represent everything I cherish about home cooking. Moreover, they demonstrate that the most memorable meals often emerge from the simplest ingredients treated with care and attention.
These wraps have transcended their role as merely a recipe in our household – they’ve become a solution for busy evenings, comfort during difficult times, and celebration food during joyous moments. Furthermore, they represent the kind of cooking that draws families together around the dinner table, fostering conversations and creating memories that endure long after the dishes are cleared.
The beauty of this recipe extends beyond its delicious results to include its remarkable flexibility and forgiveness. Whether you’re an experienced cook or just beginning your culinary journey, these wraps will build your confidence in the kitchen. Additionally, they’re budget-conscious, use accessible ingredients, and adapt gracefully to meet various dietary requirements without compromising flavor.
Most importantly, these wraps remind us that exceptional comfort food doesn’t require complexity to be extraordinary. Sometimes the most satisfying meals emerge from treating basic ingredients with care, attention, and the kitchen wisdom passed down through generations of home cooks who understood that food is love made visible.
I sincerely hope this recipe becomes as cherished in your kitchen as it has become in mine. Try it once, and I guarantee it will earn a permanent place in your weekly meal rotation. After all, when you discover something this delicious, this accessible, and this universally beloved, you treasure it and share it with everyone who matters to you.
Happy cooking, and may your kitchen always be filled with the incredible aroma of perfectly cooked garlic, the comfort of melted cheese, and the deep satisfaction that comes from creating something truly special with your own hands!