I’ll never forget the first time I tasted a King Hawaiian Cheesecake Danish. It was at a brunch potluck, and I was immediately captivated by how someone had transformed simple Hawaiian sweet rolls into such an elegant pastry. The golden, flaky layers of puff pastry cradled a cloud-like cheesecake filling, topped with juicy pineapple chunks and vibrant strawberries that seemed to sparkle in the sunlight streaming through the window. When I took my first bite, the combination of buttery pastry, tangy-sweet cream cheese filling, and tropical fruit was nothing short of revelatory. I rushed home that same day, determined to recreate this masterpiece in my own kitchen. After several attempts and tweaks, I perfected a version that’s become my go-to recipe for special weekend breakfasts and brunches with friends.
The Magic Behind King Hawaiian Cheesecake Danish
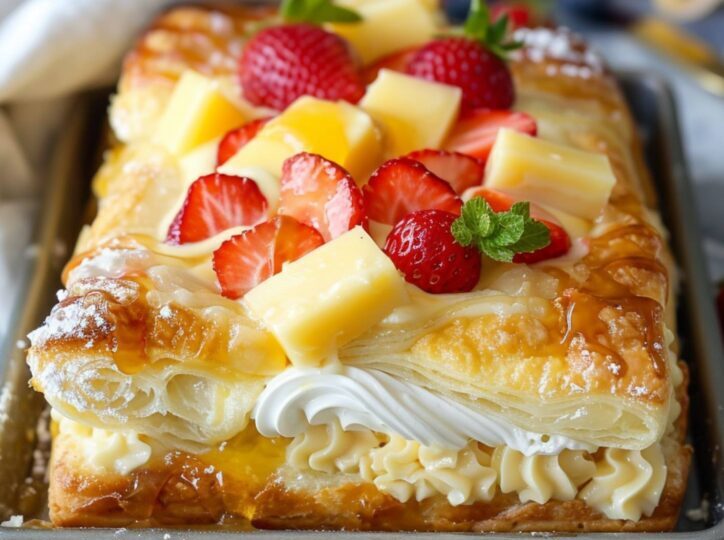
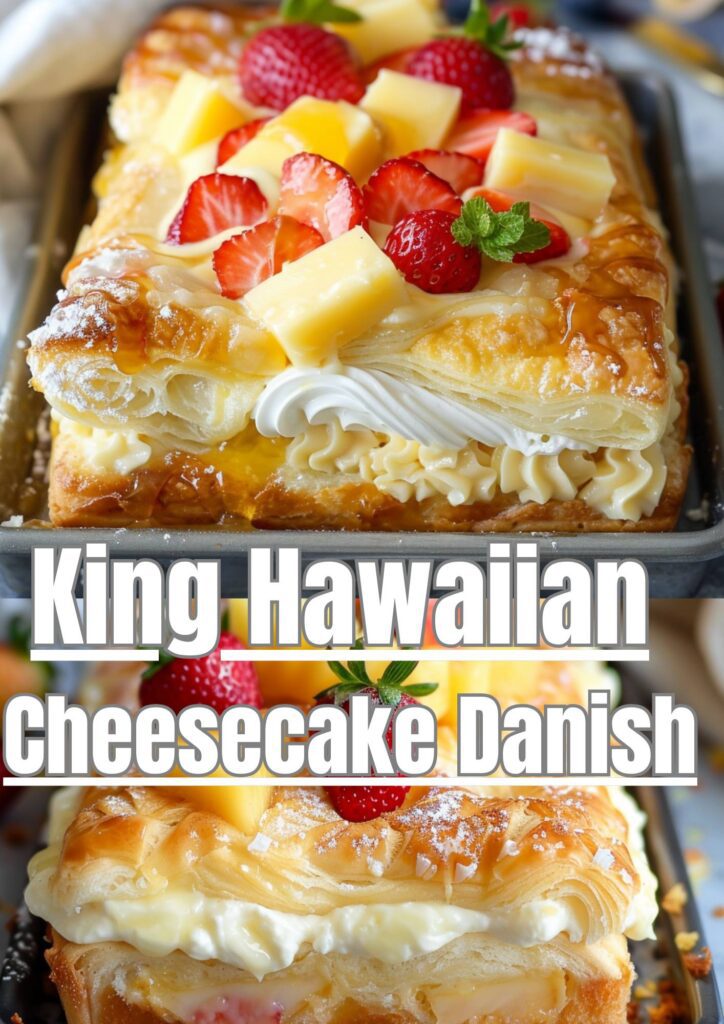
The King Hawaiian Cheesecake Danish represents the perfect fusion of continental pastry-making tradition and tropical Hawaiian flavors. What makes this danish recipe so special is how it balances multiple textures and flavors in one harmonious dessert. The puff pastry provides crispy, buttery layers that shatter delicately with each bite, while the cream cheese filling offers a smooth, tangy richness that’s neither too sweet nor too heavy. The tropical fruits—traditionally pineapple with strawberries—add freshness and natural sweetness that cuts through the richness of the cheesecake filling beautifully.
The image shows this stunning danish perfectly: golden puff pastry sheets folded into rectangular pastries, each one generously filled with swirls of white cream cheese filling. Fresh pineapple chunks and bright red strawberries crown the top, with everything glazed to a beautiful shine and dusted with powdered sugar. It’s a bakery-quality presentation that anyone can achieve at home.
Understanding the Hawaiian Cheesecake Danish Recipe
This King Hawaiian cheesecake danish recipe is surprisingly approachable despite its impressive appearance. The key is understanding that you’re working with layers—literally and figuratively. The puff pastry base provides the foundation and structure. The cream cheese filling, whipped to perfection, creates that signature cheesecake flavor without requiring baking like a traditional cheesecake. The fruit topping adds visual appeal and fresh flavor, while the glaze brings everything together with a professional finish.
Unlike traditional danishes that require making laminated dough from scratch (a labor-intensive process involving folding butter into dough multiple times), this recipe uses store-bought puff pastry, making it accessible to home bakers of all skill levels.
Ingredients for King Hawaiian Cheesecake Danish
Puff Pastry Base:
- 2 sheets frozen puff pastry (17.3 oz package), thawed according to package directions
- 1 large egg, beaten (for egg wash)
- 2 tablespoons turbinado sugar (for sprinkling)
Cream Cheese Filling:
- 16 oz cream cheese, softened to room temperature
- ½ cup granulated sugar
- 1 large egg
- 2 teaspoons pure vanilla extract
- 1 tablespoon all-purpose flour
- 1 tablespoon fresh lemon juice
- Zest of 1 lemon
Fruit Topping:
- 1 cup fresh pineapple chunks (or canned, well-drained)
- 1 cup fresh strawberries, hulled and sliced
- Additional fresh berries for garnish (optional)
- Fresh mint leaves for garnish
Glaze:
- 1 cup powdered sugar
- 2-3 tablespoons pineapple juice (or milk)
- ½ teaspoon vanilla extract
Finishing:
- Powdered sugar for dusting
Step-by-Step Instructions for Making King Hawaiian Cheesecake Danish
Preparing the Puff Pastry for Hawaiian Cheesecake Danish
Preheat your oven to 400°F (200°C) and line a large baking sheet with parchment paper. This prevents sticking and makes cleanup much easier.
Unfold the thawed puff pastry sheets on a lightly floured surface. Using a rolling pin, gently roll out each sheet to smooth any creases and make it slightly larger—about 11×12 inches. Don’t roll too aggressively or you’ll compress the layers that create that beautiful flakiness.
Cut each puff pastry sheet into 6 rectangles (about 3.5×4 inches each), giving you 12 total danishes. Place them on the prepared baking sheet, spacing them about 2 inches apart. Using a sharp knife, score a border about ½ inch from the edges of each rectangle, being careful not to cut all the way through. This creates a frame that will puff up around the filling during baking.
Brush the borders with beaten egg wash, avoiding the center where the filling will go. Prick the center of each pastry several times with a fork—this prevents excessive puffing in the middle. Sprinkle the borders lightly with turbinado sugar for added crunch and sparkle.
Making the Cream Cheese Filling
In a large mixing bowl, beat the softened cream cheese with an electric mixer on medium speed until smooth and creamy with no lumps, about 2 minutes. This step is crucial for a silky filling in your cheesecake danish recipe.
Add the granulated sugar and beat until well combined and fluffy, another minute or so. Scrape down the sides of the bowl to ensure everything is incorporated. Add the egg, vanilla extract, flour, lemon juice, and lemon zest. Beat on medium speed until the mixture is completely smooth and uniform in texture. The lemon adds a bright note that complements both the cream cheese and the tropical fruits beautifully.
Assembling the King Hawaiian Cheesecake Danish
Spoon about 2-3 tablespoons of the cream cheese filling into the center of each pastry rectangle, staying within the scored border. Use the back of the spoon to spread it gently and evenly. Don’t overfill—you want the borders to be able to puff up without the filling spilling over.
The pastries are now ready for their initial baking. Place the baking sheet in the preheated oven and bake for 15-18 minutes, until the pastry is golden brown and puffed around the edges and the filling is set but still slightly jiggly in the center. The borders should be crispy and beautifully browned.
Remove from the oven and let the danishes cool on the baking sheet for about 10 minutes. As they cool, the filling will set further. If the centers have puffed up during baking, gently press them down with the back of a spoon while they’re still warm.
Adding the Fruit Topping to Hawaiian Cheesecake Danish
While the danishes are cooling, prepare your fruit. If using canned pineapple, make sure it’s very well drained and patted dry with paper towels—excess moisture will make your danishes soggy. Cut fresh pineapple into bite-sized chunks and prepare the strawberries.
Once the danishes have cooled for 10 minutes, arrange the pineapple chunks and sliced strawberries decoratively on top of the cream cheese filling. You can create patterns, mix them together, or keep them separate—whatever appeals to you visually.
Making and Applying the Glaze
In a small bowl, whisk together the powdered sugar, pineapple juice (start with 2 tablespoons), and vanilla extract until smooth. The glaze should be thick enough to coat the back of a spoon but thin enough to drizzle easily. Add more juice if needed to reach the right consistency.
Drizzle the glaze over the fruit-topped danishes using a spoon or transfer it to a small zip-top bag with a corner snipped off for more control. Don’t worry about being too precise—the rustic look of drizzled glaze is part of the charm of this King Hawaiian cheesecake danish recipe.
Just before serving, dust the entire tray lightly with powdered sugar using a fine-mesh sieve. Add fresh mint leaves as a final garnish if desired—they add a pop of color and a subtle fresh aroma.
Nutritional Information for King Hawaiian Cheesecake Danish
Per danish (based on 12 servings):
- Calories: 320
- Total Fat: 18g
- Saturated Fat: 9g
- Cholesterol: 65mg
- Sodium: 210mg
- Total Carbohydrates: 35g
- Dietary Fiber: 1g
- Sugars: 18g
- Protein: 5g
Note: Nutritional values are approximate and will vary based on specific ingredients and portion sizes.
Expert Tips for Perfect Hawaiian Cheesecake Danish
Room Temperature is Key: Make sure your cream cheese is truly at room temperature before making the filling. Cold cream cheese will create lumps that are nearly impossible to smooth out, resulting in a less-than-ideal texture in your cheesecake danish recipe.
Don’t Skip the Scoring: That border you score around the edges is crucial for creating that raised frame that contains the filling and gives these danishes their signature look.
Watch the Baking Time: Every oven is different, so start checking at 15 minutes. The pastry should be deeply golden and the filling should still have a slight jiggle in the center when you shake the pan gently.
Pat Fruit Dry: Any moisture on your fruit will water down the filling and make the pastry soggy. Take the extra minute to pat everything very dry.
Serve Fresh: While these King Hawaiian cheesecake danishes can be stored, they’re absolutely best within a few hours of making them when the pastry is still crispy.
Variations for King Hawaiian Cheesecake Danish Recipe
Tropical Variation: Replace strawberries with mango chunks and add toasted coconut flakes over the top for an even more tropical version of this Hawaiian cheesecake danish.
Berry Bliss: Skip the pineapple entirely and use a mixed berry topping with strawberries, blueberries, and raspberries for a more traditional danish flavor profile.
Chocolate Hawaiian Danish: Add 2 tablespoons of cocoa powder to the cream cheese filling and drizzle with chocolate ganache instead of the pineapple glaze.
Macadamia Crunch: Sprinkle chopped macadamia nuts over the top before glazing for added crunch and authentic Hawaiian flavor.
Passion Fruit Twist: Replace the pineapple juice in the glaze with passion fruit juice or pulp for an exotic variation that tastes like you’re on vacation.
Presentation Ideas for King Hawaiian Cheesecake Danish
These pastries are naturally beautiful, but you can take them to the next level with thoughtful presentation. Arrange them on a large white platter in rows, allowing the colorful fruits to be the star of the show. Scatter additional fresh berries and pineapple pieces around the platter for an abundant, bountiful look.
For individual servings, place each danish on a small dessert plate with a dollop of whipped cream on the side and a sprig of fresh mint. A light dusting of additional powdered sugar right before serving makes them look freshly made and extra special.
For brunch parties, create a danish bar where guests can choose their own fruit toppings. Bake the pastries with just the cream cheese filling, then set out bowls of various fruits, nuts, and glazes so everyone can customize their own King Hawaiian cheesecake danish.
Pairing Suggestions for Hawaiian Cheesecake Danish
These danishes are perfect for breakfast, brunch, or dessert. They pair wonderfully with:
- Freshly brewed Kona coffee for an all-Hawaiian experience
- Champagne or prosecco for brunch celebrations
- Tropical fruit smoothies for a completely fruit-forward meal
- Hot tea, particularly green tea or chai, which complements the sweet and tangy flavors
- Fresh-squeezed orange juice for a vitamin-packed morning treat
Storage and Make-Ahead Tips
King Hawaiian cheesecake danishes are best enjoyed fresh, but you can prepare components ahead to make morning assembly easier. The cream cheese filling can be made up to 2 days in advance and stored covered in the refrigerator. Let it come to room temperature before using.
The danishes can be assembled without the fruit topping and baked, then stored in an airtight container in the refrigerator for up to 2 days. Add the fresh fruit and glaze just before serving. Reheat in a 350°F oven for 5-7 minutes to crisp up the pastry before adding fruit.
Fully assembled danishes should be consumed within 24 hours for best quality, stored in the refrigerator in an airtight container.
Why This King Hawaiian Cheesecake Danish Recipe Works
The success of this recipe comes from the balance of pre-made convenience (the puff pastry) with homemade quality (the cream cheese filling). Puff pastry is notoriously difficult to make from scratch, requiring precise temperature control and technique. Using high-quality store-bought pastry gives you professional results without the stress.
The cream cheese filling mimics the flavor of cheesecake without requiring the long baking time or water bath that traditional cheesecake demands. The addition of lemon brightens the filling and prevents it from being too rich or heavy. The tropical fruits add moisture, sweetness, and visual appeal, while their natural acidity balances the richness of the cream cheese and butter.
Together, all these elements create a pastry that’s impressive enough for special occasions but simple enough for a weekend morning when you want to treat yourself and your family to something extraordinary.
My Personal Cooking Tip
After making these danishes countless times, I’ve discovered that the secret to bakery-quality results lies in two things: patience and proper prep. First, don’t rush the thawing of your puff pastry. Let it thaw in the refrigerator overnight rather than at room temperature—this prevents it from becoming too soft to work with and helps maintain those distinct layers. Second, invest in a good pastry brush for the egg wash. A silicone one is ideal because it won’t lose bristles in your food and distributes the wash more evenly. When brushing the borders, use gentle strokes in one direction rather than back and forth, which can compress the layers. Finally, here’s my favorite trick: place a small dish of water in the oven while baking. The steam helps create an even more dramatic puff in the pastry. Most importantly, don’t be intimidated by the fancy appearance of these King Hawaiian cheesecake danishes. They truly are much easier than they look, and the moment you see your family’s faces light up when you present these beautiful pastries, you’ll know every minute spent was worth it!