
Let me share the story of how a Mexican restaurant favorite collided with my love for garlic bread and created something absolutely magical. It was one of those evenings when I was craving enchiladas but didn’t want the heaviness of traditional red sauce. At the same time, my family had been obsessing over a cheesy garlic bread appetizer we’d had at a local Italian spot. So I thought—why not combine them? The result was these Baked Cheesy Garlic Chicken Wraps, and honestly, they’ve become one of the most-requested dinners in my household.
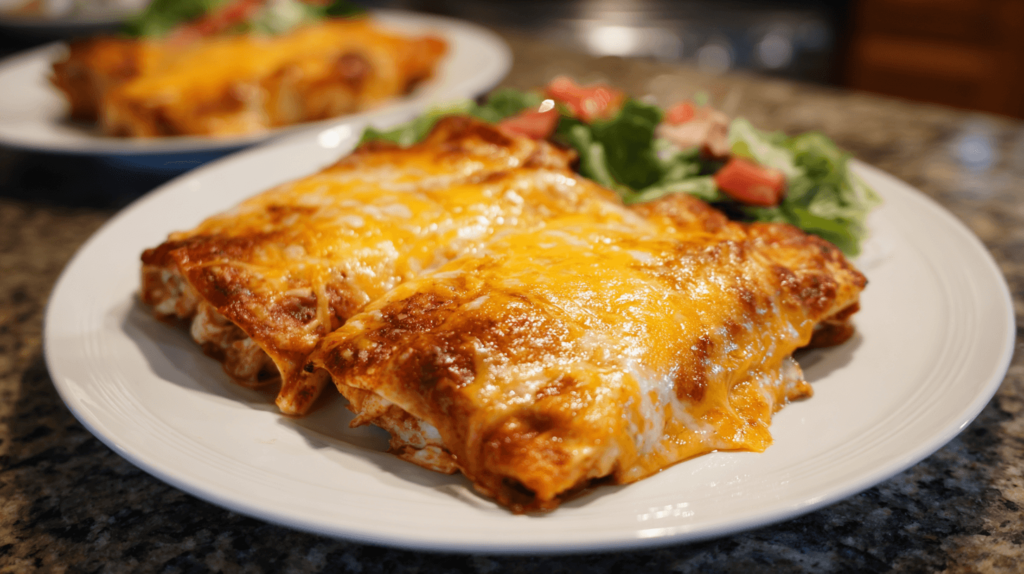
Picture this: tender, seasoned chicken wrapped in soft flour tortillas, blanketed with a creamy garlic sauce and loads of melted cheese, then baked until golden and bubbly. When you cut into them, that cheese pulls in those Instagram-worthy strings, and the aroma of garlic and herbs fills your entire kitchen. My kids call them “the cheesy roll-ups,” and my husband says they’re better than anything we could order for delivery. The best part? They’re deceptively easy to make and perfect for feeding a crowd or meal-prepping for the week.
Why These Baked Cheesy Garlic Chicken Wraps Are Absolutely Irresistible
The Perfect Marriage of Flavors
These wraps combine the best elements of multiple comfort foods: the wrapped, saucy satisfaction of enchiladas, the garlicky, cheesy goodness of garlic bread, and the protein-packed heartiness of a chicken burrito. It’s fusion cooking at its most delicious.
Make-Ahead Friendly
You can assemble these wraps completely, refrigerate them for up to 24 hours, and then bake when you’re ready. This makes them perfect for entertaining, meal prep, or those nights when you need dinner to practically cook itself while you handle everything else.
Feeds a Crowd Without Breaking the Bank
One batch makes 6-8 generous wraps, which easily feeds 4-6 people depending on appetites. The ingredients are budget-friendly, and the recipe scales up beautifully if you’re feeding more people. I’ve doubled this recipe for parties countless times.
Customizable and Adaptable
Once you master the basic technique, you can adapt these wraps endlessly. Different proteins, various cheese combinations, add vegetables, change up the herbs—the possibilities are truly endless.
Essential Ingredients for Baked Cheesy Garlic Chicken Wraps
Chicken Filling
- 1.5 pounds cooked chicken breast, shredded or diced (about 4 cups)
- 1 cup sour cream or Greek yogurt
- 2 teaspoons garlic powder
- 1 teaspoon onion powder
- 1 teaspoon Italian seasoning
- ½ teaspoon salt
- ¼ teaspoon black pepper
- 1 cup shredded mozzarella cheese (for the filling)
- ¼ cup chopped fresh parsley or cilantro
Rotisserie chicken is your best friend here—it saves so much time and adds great flavor!
Wraps
- 6-8 large flour tortillas (10-inch size works best)
- 2 cups shredded mozzarella cheese (for topping)
- ½ cup shredded cheddar cheese (for extra flavor)
For the Creamy Garlic Butter Sauce
- 4 tablespoons butter, melted
- 4 cloves garlic, minced (or 1 tablespoon garlic paste)
- 2 tablespoons fresh parsley, finely chopped
- ¼ teaspoon salt
- ¼ teaspoon Italian seasoning
This garlic butter is what takes these wraps from good to unforgettable!
Optional Add-Ins
- Sautéed bell peppers for color and nutrition
- Diced green chiles for a mild kick
- Cream cheese (2-3 oz) mixed into the filling for extra creaminess
- Cooked bacon bits for smoky flavor
- Spinach for added vegetables
Step-by-Step Instructions for Perfect Baked Garlic Chicken Wraps
Preparing Your Chicken Filling
The foundation of great wraps starts with a flavorful filling that holds together well.
Prepare your chicken: If using rotisserie chicken, remove all the meat from the bones and shred it with two forks or your hands. If using plain cooked chicken breast, dice or shred it into bite-sized pieces. You want roughly 4 cups of chicken.
Make the creamy mixture: In a large mixing bowl, combine your sour cream (or Greek yogurt if you want extra protein), garlic powder, onion powder, Italian seasoning, salt, and pepper. Stir until smooth and well-combined. This creamy base binds everything together and infuses the chicken with flavor.
Combine chicken and seasonings: Add your shredded chicken to the bowl with the creamy mixture. Fold everything together until the chicken is completely coated. The mixture should be creamy but not soupy.
Add cheese and herbs: Fold in 1 cup of shredded mozzarella cheese and your chopped parsley or cilantro. The cheese melts into the filling as it bakes, creating pockets of gooey goodness. The fresh herbs add a bright note that cuts through the richness.
Taste and adjust: This is your chance to customize! Taste the filling (it’s safe—the chicken is already cooked) and add more garlic powder, salt, or herbs if needed. Everyone’s taste preferences are different.
Making the Show-Stopping Garlic Butter
This is what makes these wraps truly special—don’t skip it!
Melt the butter: In a small bowl or measuring cup, melt your butter in the microwave (about 30 seconds on high).
Add the aromatics: Stir in your minced garlic, chopped fresh parsley, salt, and Italian seasoning. Mix well. The residual heat from the butter will bloom the garlic flavor without making it raw or harsh.
Let it sit: If you have a few minutes, let this mixture sit while you assemble the wraps. The flavors will meld together beautifully.
Assembling Your Cheesy Chicken Wraps
Now for the fun part—building your wraps!
Preheat your oven: Set it to 350°F (175°C). This moderate temperature ensures the wraps heat through completely without the tortillas getting too crispy or dried out.
Prepare your baking dish: Lightly grease a 9×13-inch baking dish with cooking spray or a bit of butter. You can also line it with parchment paper for even easier cleanup.
Warm your tortillas: This step is optional but helpful—warming tortillas for 15-20 seconds in the microwave makes them more pliable and less likely to crack when you roll them.
Fill each tortilla: Lay a tortilla flat on your work surface. Spoon about ½ to ⅔ cup of the chicken filling down the center of the tortilla, leaving about 2 inches empty at each end and each side.
The rolling technique:
- Fold in the left and right sides of the tortilla over the filling (about 1-2 inches on each side)
- Starting from the bottom, tightly roll the tortilla upward, keeping the sides tucked in
- Place seam-side down in your prepared baking dish
Arrange in the dish: Place each wrap seam-side down, nestled close together in the baking dish. They should fit snugly—this helps them hold their shape during baking.
Brush with garlic butter: Using a pastry brush or spoon, generously brush the garlic butter mixture over the top of each wrap. Make sure to get it on all exposed surfaces. Don’t be shy—this is where the flavor lives!
Top with cheese: Sprinkle the remaining 2 cups of mozzarella and ½ cup of cheddar cheese evenly over all the wraps. You want full coverage for that irresistible cheesy top.
Baking to Golden Perfection
Cover and bake: Cover the baking dish tightly with aluminum foil. This traps steam and helps everything heat through evenly without drying out. Bake for 20 minutes.
Uncover and finish: Remove the foil and continue baking for another 10-15 minutes, until the cheese on top is melted, bubbly, and starting to turn golden brown in spots. If you like extra-browned cheese, you can turn on the broiler for the last 2-3 minutes—just watch carefully so it doesn’t burn!
Rest before serving: Let the wraps rest in the pan for 5 minutes after removing from the oven. This allows the cheese to set slightly, making them easier to serve and preventing the filling from oozing out.
Serving Your Baked Garlic Chicken Wraps
Garnish beautifully: Sprinkle with extra fresh parsley or cilantro right before serving. You can also add a sprinkle of red pepper flakes if you like a little heat.
Serve with sides: These wraps are substantial on their own, but they pair wonderfully with a crisp green salad, Spanish rice, black beans, or roasted vegetables.
Presentation matters: Serve them right from the baking dish for a rustic, family-style presentation, or plate individually with a garnish of fresh herbs and a side salad for a more elegant look.
Nutritional Breakdown of Baked Cheesy Garlic Chicken Wraps
Per wrap (makes 6-8 servings):
- Calories: 450-520
- Protein: 38-42g
- Carbohydrates: 28-32g
- Fat: 22-26g
- Fiber: 2-3g
- Calcium: High (from cheese and dairy)
These wraps are protein-rich and satisfying, making them a complete meal in one delicious package.
Creative Variations for Your Chicken Wraps
Buffalo Chicken Enchilada Wraps
Replace half the sour cream with buffalo sauce and add blue cheese crumbles or ranch dressing to the filling. Top with a drizzle of buffalo sauce before baking.
Mexican-Style Chicken Wraps
Add taco seasoning to the chicken filling, use pepper jack cheese instead of mozzarella, and top with salsa verde, cilantro, and sliced jalapeños after baking.
Pesto Chicken Wraps
Add 3-4 tablespoons of pesto to the chicken filling and use a combination of mozzarella and parmesan cheese. Replace the garlic butter with more pesto before baking.
BBQ Chicken Wraps
Mix ½ cup BBQ sauce into the chicken filling, add diced red onion, and use a combination of cheddar and gouda cheese. Skip the garlic butter or replace it with more BBQ sauce.
Vegetarian Garlic Cheese Wraps
Replace chicken with sautéed vegetables (bell peppers, zucchini, mushrooms, spinach), black beans, or a combination. Add cream cheese to the filling for extra creaminess.
Perfect Pairings and Serving Suggestions
Side Dishes
- Caesar salad with crunchy croutons provides a refreshing contrast
- Mexican street corn (elote) adds sweet, smoky flavor
- Black beans and rice makes it a complete Latin-inspired meal
- Roasted vegetables like broccoli or asparagus add nutrition
- Chips and salsa or guacamole for dipping
Sauces and Toppings
While these wraps are delicious on their own, some people love extra sauces:
- Sour cream or Greek yogurt
- Salsa (fresh pico de gallo, salsa verde, or red salsa)
- Guacamole or sliced avocado
- Hot sauce or sriracha
- Ranch dressing for cooling creaminess
Meal Prep and Storage Tips
Make-Ahead Instructions
Assemble completely in advance: You can assemble these wraps up to 24 hours before baking. Cover tightly with plastic wrap and refrigerate. When ready to bake, remove from the fridge and let sit at room temperature for 15-20 minutes while the oven preheats, then bake as directed (you may need to add 5 extra minutes to the covered baking time).
Freeze unbaked wraps: Assemble the wraps and freeze them in the baking dish (wrapped tightly) or individually wrapped in plastic wrap and foil. Freeze for up to 2 months. Thaw overnight in the refrigerator before baking.
Prep components separately: Make the chicken filling up to 3 days in advance and store in an airtight container. Make the garlic butter and store in the fridge. Assemble and bake when ready.
Storing and Reheating Leftovers
Refrigerate: Store leftover baked wraps in an airtight container in the refrigerator for up to 3-4 days.
Reheat in the oven: Place wraps on a baking sheet, cover with foil, and reheat at 350°F for 15-20 minutes until heated through. This method keeps them from drying out.
Microwave method: Place a wrap on a microwave-safe plate, cover with a damp paper towel, and microwave for 1-2 minutes until hot. The damp paper towel prevents the tortilla from getting tough.
Air fryer method: Reheat at 350°F for 5-7 minutes for crispy edges.
Frequently Asked Questions
Can I use corn tortillas instead of flour? Flour tortillas work best because they’re more pliable and less likely to crack. Corn tortillas can break when rolled with this much filling.
What if I don’t have sour cream? Greek yogurt is an excellent substitute that adds extra protein. You can also use a combination of cream cheese (softened) and a bit of milk.
Can I make these with leftover Thanksgiving turkey? Absolutely! This is a fantastic way to use up leftover turkey. Just substitute it for the chicken in the same quantities.
How do I prevent the wraps from getting soggy? Make sure your chicken filling isn’t too wet—it should be creamy but not soupy. Also, don’t add wet toppings like salsa until after baking.
Can I use different types of cheese? Yes! Pepper jack adds heat, gouda adds smokiness, and a Mexican blend works great. Just avoid cheeses that don’t melt well, like feta.
Why do my tortillas crack when I roll them? Warm them slightly first (15-20 seconds in the microwave), and make sure they’re fresh and pliable. Old, dried-out tortillas will crack.
Expert Tips for the Best Baked Garlic Chicken Wraps
After making these wraps dozens of times and perfecting every detail, here are my top tips:
Use rotisserie chicken for the best flavor and to save time. The seasoning from rotisserie chicken adds depth you can’t get from plain boiled chicken.
Don’t overfill your wraps—it’s tempting, but overstuffed wraps are hard to roll and tend to burst open during baking. Stick to ½-⅔ cup of filling per tortilla.
Fresh garlic is key—while garlic powder works in the filling, use fresh minced garlic in the butter sauce for that bold, aromatic flavor that makes these wraps special.
Brush the garlic butter while the wraps are still slightly warm—it absorbs better and creates a more flavorful coating.
Let them rest after baking—those 5 minutes make a huge difference in how neatly they cut and how the cheese sets.
Shred your own cheese from a block rather than using pre-shredded. Pre-shredded cheese contains anti-caking agents that prevent optimal melting.
Conclusion: Your New Go-To Comfort Meal
These Baked Cheesy Garlic Chicken Wraps are everything a comfort food recipe should be: indulgent yet somehow still satisfying in a wholesome way, impressive-looking yet simple to make, and most importantly, so delicious that everyone at your table will be fighting over the last one.
I love that this recipe works for so many occasions—a casual Tuesday night dinner, a potluck contribution, a make-ahead meal when you know you’ll have a busy week, or even a dish to bring to someone who needs a comforting meal. The combination of tender chicken, creamy filling, melted cheese, and that irresistible garlic butter creates something that feels special without requiring special skills or hard-to-find ingredients.
The best part about these wraps is how they’ve become one of those recipes that brings people together. Whether it’s my kids helping me roll them up, my husband sneaking a taste of the garlic butter, or friends asking for the recipe after trying them, these wraps have a way of creating happy moments in the kitchen and around the table.
So next time you’re craving comfort food that’s a little bit special, a little bit different, and a whole lot delicious, remember these Baked Cheesy Garlic Chicken Wraps. They’re waiting to become your new favorite thing to make, and I promise they won’t disappoint!