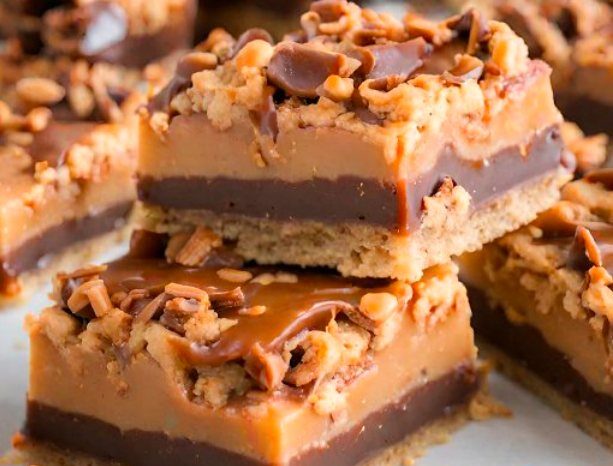
These Butterfinger Caramel Bars are a must-try for anyone who loves a mix of textures and flavors. A buttery crust forms the base, followed by a smooth caramel layer, and topped off with chopped Butterfinger bars and a rich chocolate-peanut butter drizzle. Perfect for parties, potlucks, or an indulgent treat!
Ingredients
For the Crust
- 1 cup all-purpose flour
- 1/4 cup granulated sugar
- 1/2 cup butter, softened
For the Caramel Filling
- 10 oz caramel candies
- 3 tablespoons heavy cream
For the Topping
- 1 1/2 cups chopped Butterfinger bars
- 1 cup milk chocolate chips
- 3 tablespoons peanut butter
Quick Details
- Prep Time: 20 minutes
- Cooking Time: 15 minutes
- Chilling Time: 2 hours
- Total Time: 2 hours 35 minutes
- Servings: 16 bars
- Calories: 320 per serving
Instructions
Step 1: Prepare the Crust
- Preheat Oven: Preheat the oven to 350°F (175°C).
- Line the Pan: Line an 8×8-inch baking pan with parchment paper, leaving extra overhang for easy removal.
- Mix Ingredients: In a mixing bowl, combine the flour, granulated sugar, and softened butter. Mix until the mixture becomes crumbly.
- Bake the Crust: Press the crust mixture evenly into the bottom of the prepared pan. Bake for 15 minutes, or until lightly golden.
Step 2: Make the Caramel Filling
- Melt Caramels: In a microwave-safe bowl, add the caramel candies and heavy cream. Microwave in 30-second intervals, stirring after each, until the caramel is smooth and melted.
- Pour Over Crust: Carefully pour the melted caramel over the baked crust, spreading evenly.
Step 3: Add the Topping
- Butterfinger Layer: Sprinkle the chopped Butterfinger bars evenly over the caramel layer.
- Chocolate-Peanut Butter Drizzle: In a separate microwave-safe bowl, melt the milk chocolate chips and peanut butter together in 30-second intervals, stirring until smooth. Drizzle or spread this mixture over the Butterfinger layer.
Step 4: Chill and Serve
- Refrigerate: Place the pan in the refrigerator for at least 2 hours to set.
- Cut into Bars: Once chilled, lift the bars out of the pan using the parchment paper, and cut into 16 squares.
Tips for Success
- Chilling Time: For cleaner cuts, chill the bars for a full 2 hours or longer before slicing.
- Melting Caramel: Stir frequently to prevent scorching, as caramel can burn quickly in the microwave.
- Butterfinger Topping: To keep the Butterfinger bars crunchy, sprinkle them on just before adding the chocolate drizzle.

Nutritional Information (Per Serving)
| Nutrient | Amount per Serving |
|---|---|
| Calories | 320 kcal |
| Total Fat | 18g |
| Carbohydrates | 38g |
| Protein | 3g |
Frequently Asked Questions
1. Can I use homemade caramel instead of caramel candies?
Yes, homemade caramel can work well. Just make sure it’s thick enough to hold its shape when layered.
2. How do I store Butterfinger Caramel Bars?
Store the bars in an airtight container in the fridge for up to a week. Allow them to come to room temperature before serving for a softer texture.
3. Can I freeze these bars?
Yes, you can freeze them! Wrap them individually in plastic wrap, then store in an airtight container for up to 3 months. Thaw in the fridge before serving.
Conclusion
These Butterfinger Caramel Bars are a delightful, crowd-pleasing treat that combines layers of flavor and textures in every bite. With a buttery crust, gooey caramel, crunchy Butterfinger pieces, and a chocolate-peanut butter topping, this recipe is sure to become a favorite for any dessert lover!
