Introduction
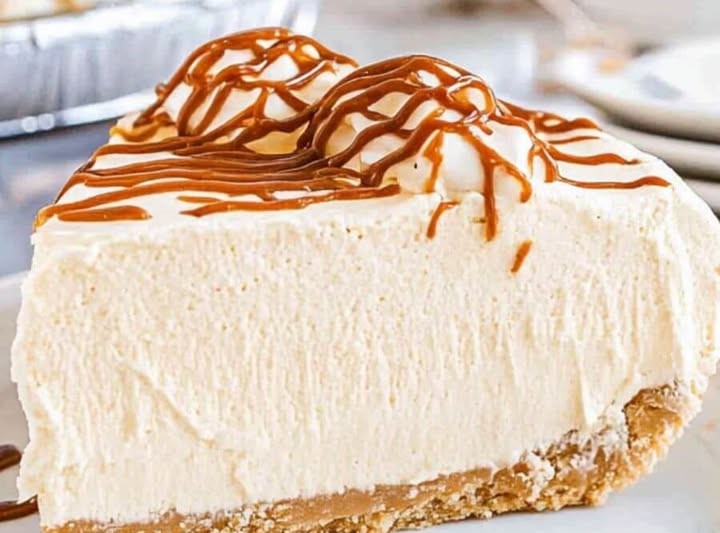
There are certain desserts that transport you back to childhood with just one bite, and caramel cream pie is exactly that kind of dessert for me. I remember my grandmother making this pie for Sunday dinners, the kitchen filled with the intoxicating aroma of caramelizing sugar and vanilla. Years later, when I finally asked for her recipe, I discovered that this seemingly fancy dessert was surprisingly achievable for home bakers. This caramel cream pie features a buttery, flaky crust filled with the most luxurious caramel custard you’ve ever tasted—smooth, silky, and bursting with deep caramel flavor. Topped with billowy whipped cream and drizzled with extra caramel sauce, it’s a showstopper that looks like it came from a high-end bakery but can be made in your own kitchen. The combination of that crispy crust, velvety caramel filling, and fluffy cream creates a textural experience that’s absolutely divine. Whether you’re celebrating a special occasion or simply craving something extraordinarily delicious, this caramel cream pie delivers elegance and comfort in equal measure.
Why This Caramel Cream Pie Is Simply Irresistible
The Perfect Balance of Sweet and Rich
This caramel cream pie achieves that ideal balance where the caramel flavor is prominent and sophisticated without being overwhelmingly sweet. The slight bitterness from properly caramelized sugar adds complexity, while the cream tempers the intensity, creating a harmonious flavor profile.
Homemade Caramel Makes All the Difference
While you could use store-bought caramel, making it from scratch elevates this pie to another level. Fresh caramel has a depth of flavor and smoothness that jarred versions simply cannot match. Plus, making caramel is easier than most people think once you understand the process.
A Cream Pie That Stays Perfectly Set
One of the frustrations with cream pies can be filling that’s too runny or too stiff. This recipe creates a custard filling that slices beautifully, holding its shape while still being spoonable and creamy. The texture is absolutely perfect.
Impressive Yet Achievable
This caramel cream pie looks and tastes like something from a professional pastry kitchen, yet it’s completely doable for home bakers. The steps are straightforward, and the results are consistently impressive.
Essential Ingredients for Caramel Cream Pie
For the Pie Crust
- 1¼ cups all-purpose flour – Forms the structure of the crust
- ½ teaspoon salt – Enhances flavor
- 1 tablespoon granulated sugar – Adds subtle sweetness
- ½ cup cold unsalted butter, cubed – Creates flakiness
- 3-4 tablespoons ice water – Brings the dough together
Alternatively, use one store-bought 9-inch pie crust for convenience
For the Caramel Custard Filling
- 1 cup granulated sugar – Caramelizes for the base flavor
- ¼ cup water – Helps dissolve the sugar for caramelization
- 2 cups whole milk, warmed – Creates the custard base
- ½ cup heavy cream – Adds richness and smoothness
- 5 large egg yolks – Thickens and enriches the custard
- ⅓ cup cornstarch – Provides structure and prevents curdling
- ¼ teaspoon salt – Balances sweetness
- 3 tablespoons unsalted butter – Adds silkiness and flavor
- 1 tablespoon vanilla extract – Enhances all the flavors
For the Whipped Cream Topping
- 1½ cups heavy whipping cream, cold – The base of your topping
- 3 tablespoons powdered sugar – Sweetens and stabilizes
- 1 teaspoon vanilla extract – Adds flavor depth
- Pinch of salt – Enhances sweetness
For the Caramel Drizzle
- ½ cup granulated sugar – For the drizzle caramel
- 2 tablespoons water – Helps the sugar dissolve
- ¼ cup heavy cream, warmed – Creates sauce consistency
- 2 tablespoons unsalted butter – Adds richness
- Pinch of sea salt – Creates salted caramel (optional)
Step-by-Step Instructions for Perfect Caramel Cream Pie
Preparing and Baking the Pie Crust
If making homemade crust, combine flour, salt, and sugar in a large bowl. Add the cold butter cubes and use a pastry cutter, two forks, or your fingertips to work the butter into the flour until the mixture resembles coarse crumbs with some pea-sized butter pieces remaining.
Drizzle 3 tablespoons of ice water over the mixture and toss with a fork. Add more water, one tablespoon at a time, until the dough just comes together when pressed. Don’t overmix—the dough should be slightly shaggy but hold together.
Form the dough into a disk, wrap in plastic wrap, and refrigerate for at least 30 minutes or up to 2 days. This rest period allows the gluten to relax and the butter to firm up, making the dough easier to roll.
When ready to bake, preheat your oven to 375°F (190°C). Roll the chilled dough on a lightly floured surface into a 12-inch circle, about ⅛-inch thick. Transfer to a 9-inch pie pan, gently pressing it into the bottom and up the sides. Trim excess dough, leaving a ½-inch overhang, then fold under and crimp decoratively.
Line the crust with parchment paper or aluminum foil and fill with pie weights or dried beans. This “blind baking” prevents the crust from puffing up. Bake for 15 minutes, then remove the weights and parchment and bake for another 10-12 minutes until golden brown. Let cool completely.
Making the Caramel Base for the Filling
This is where the magic happens! In a large, heavy-bottomed saucepan (preferably light-colored so you can see the caramel color developing), combine 1 cup sugar and ¼ cup water. Stir gently to combine, making sure all the sugar is moistened.
Place over medium-high heat and bring to a boil without stirring. Once boiling, stop stirring completely—swirl the pan occasionally if needed to ensure even cooking. Resist the urge to stir, as this can cause crystallization.
Watch carefully as the mixture goes from clear to pale yellow to amber. This takes about 8-12 minutes. The caramel is ready when it’s a deep amber color—think of the color of an old penny. Remove from heat immediately when you reach this color; it will continue to darken slightly from residual heat.
Here’s the exciting part: carefully and slowly pour in the warmed milk and cream. The mixture will bubble up dramatically and may even seize (harden) temporarily—this is normal! Return the pan to medium-low heat and whisk gently until the caramel completely dissolves into the milk, creating a smooth caramel mixture. This may take 2-3 minutes.
Creating the Silky Caramel Custard
In a medium bowl, whisk together the egg yolks, cornstarch, and salt until smooth and well combined. Slowly pour about 1 cup of the hot caramel mixture into the egg yolks while whisking constantly. This process, called tempering, gradually raises the temperature of the eggs without scrambling them.
Pour the tempered egg mixture back into the saucepan with the remaining caramel mixture, whisking constantly. Cook over medium heat, whisking continuously, until the mixture thickens considerably and comes to a gentle boil. This takes about 5-7 minutes.
Once boiling, continue cooking and whisking for 2 more minutes. The custard should be thick enough to coat the back of a spoon and hold a line when you run your finger through it. Remove from heat.
Whisk in the butter and vanilla extract until the butter is completely melted and incorporated. The butter adds a beautiful sheen and silky texture to the custard.
Filling the Pie and Preventing Skin Formation
Strain the hot custard through a fine-mesh sieve into the cooled pie crust. This removes any bits of cooked egg or lumps, ensuring a perfectly smooth filling. Use a rubber spatula to help press the custard through the sieve.
Smooth the top with a spatula, making sure the filling reaches all the edges. To prevent a skin from forming on the surface as it cools, press a piece of plastic wrap directly onto the surface of the custard, smoothing out any air bubbles.
Refrigerate the pie for at least 4 hours, but preferably overnight. The filling needs this time to set properly and develop its full flavor. The longer it chills, the better it will slice.
Making the Perfect Whipped Cream Topping
When your pie is thoroughly chilled and you’re ready to serve (or up to 4 hours before serving), make the whipped cream. Make sure your bowl and beaters are cold—I often chill them in the freezer for 10 minutes first.
Pour the cold heavy cream into the chilled bowl. Begin beating on medium-low speed, gradually increasing to medium-high as the cream thickens. When the cream begins to thicken, add the powdered sugar, vanilla, and salt.
Continue beating until stiff peaks form—the cream should hold its shape when you lift the beaters and not droop. Be careful not to overbeat, or you’ll end up with butter! The whole process takes about 3-4 minutes.
Remove the plastic wrap from the chilled pie. Spread or pipe the whipped cream over the top of the pie. You can spread it rustic-style with a spatula, creating swoops and swirls, or use a piping bag with a star tip for elegant rosettes around the edge.
Creating the Caramel Drizzle
For the finishing touch, make a quick caramel sauce. In a small, heavy-bottomed saucepan, combine ½ cup sugar and 2 tablespoons water. Cook over medium-high heat without stirring until it becomes a deep amber color, about 6-8 minutes.
Remove from heat and carefully whisk in the warmed cream—it will bubble vigorously. Add the butter and a pinch of sea salt if making salted caramel. Whisk until smooth.
Let the caramel cool for 5-10 minutes until it’s still pourable but has thickened slightly. Drizzle it artistically over the whipped cream in a zigzag or spiral pattern. You can also drizzle some around the edge so it runs down the sides for a dramatic effect.
Pro Tips for Caramel Cream Pie Success
Mastering the Caramel
The key to perfect caramel is patience and attention. Don’t stir once the sugar dissolves and begins to boil—swirl the pan instead. Watch the color carefully in the last few minutes, as it can go from perfect to burnt quickly. When in doubt, take it off the heat a shade lighter than you think—it will continue to darken.
Temperature Control Is Critical
Always warm your milk and cream before adding to the caramel. Cold liquid will cause the hot caramel to seize into hard chunks that are difficult to dissolve. Similarly, when tempering eggs, add the hot liquid slowly while whisking to prevent scrambling.
Whisk Constantly for Smooth Custard
When cooking the custard, constant whisking is non-negotiable. This prevents the eggs from curdling and ensures even cooking. Use a whisk rather than a spoon for the best results.
The Plastic Wrap Trick
Pressing plastic wrap directly on the custard surface while it cools prevents that tough skin from forming. Make sure it’s touching the entire surface with no air pockets.
Timing Your Whipped Cream
Don’t add the whipped cream topping until shortly before serving, or at most 4 hours ahead. Whipped cream can weep (release liquid) if it sits too long, making your beautiful pie look messy.
Nutritional Information for Caramel Cream Pie
Per serving (1 slice, recipe makes 8 servings):
- Calories: 520
- Total Fat: 32g
- Saturated Fat: 19g
- Trans Fat: 0g
- Cholesterol: 215mg
- Sodium: 280mg
- Total Carbohydrates: 54g
- Dietary Fiber: 1g
- Sugars: 38g
- Protein: 6g
- Vitamin A: 25% DV
- Calcium: 12% DV
- Iron: 6% DV
Note: Nutritional values are estimates and will vary based on specific ingredients used.
Serving Suggestions for Caramel Cream Pie
Perfect Occasions for This Elegant Dessert
Caramel cream pie is perfect for Thanksgiving dinner, Christmas celebrations, birthday parties, dinner parties, potlucks, anniversary celebrations, or any time you want to impress. It’s sophisticated enough for formal occasions yet comforting enough for family gatherings.
How to Present Your Caramel Cream Pie
Serve slices on white dessert plates to showcase the beautiful layers. Drizzle additional caramel sauce on the plate before placing the slice for restaurant-style presentation. Add a small dollop of whipped cream on the side and a sprinkle of flaky sea salt for contrast.
Perfect Pairings with Caramel Cream Pie
This rich pie pairs beautifully with hot coffee, especially espresso or cappuccino. For an indulgent treat, serve with salted caramel ice cream on the side. Dessert wines like tawny port or cream sherry complement the caramel beautifully. For non-alcoholic options, try vanilla rooibos tea or caramel-flavored coffee.
Creative Variations of Caramel Cream Pie
Salted Caramel Cream Pie
Add ½ to 1 teaspoon of flaky sea salt to the caramel custard and sprinkle additional salt over the whipped cream topping. The salt enhances the caramel flavor and adds sophisticated complexity. This is my personal favorite variation!
Chocolate Caramel Cream Pie
Add 4 ounces of chopped dark chocolate to the hot caramel custard, whisking until melted. This creates a chocolate-caramel hybrid that’s absolutely decadent. Top with chocolate shavings along with the whipped cream.
Bourbon Caramel Cream Pie
Add 2-3 tablespoons of bourbon to the finished custard for an adult version. The bourbon adds depth and complexity that pairs wonderfully with caramel. Make sure to mention it contains alcohol when serving!
Banana Caramel Cream Pie
Layer sliced bananas over the baked crust before adding the caramel custard. The banana-caramel combination is classic and delicious, reminiscent of bananas foster. Top with additional banana slices before adding the whipped cream.
Caramel Apple Cream Pie
Add 1 cup of finely diced cooked apples (tossed with cinnamon) to the custard, or layer them in the crust before pouring in the filling. This fall-inspired version is perfect for Thanksgiving.
Turtle Cream Pie
Sprinkle chopped pecans over the crust before filling, then top the finished pie with chocolate ganache drizzle along with the caramel. It’s like a turtle candy in pie form!
Storage and Make-Ahead Instructions for Caramel Cream Pie
Refrigerator Storage
Store caramel cream pie covered in the refrigerator for up to 3 days. The crust may soften slightly over time, but the flavor remains excellent. Cover loosely with plastic wrap or store in a pie keeper to protect the whipped cream topping.
Freezing Caramel Cream Pie
You can freeze the filled pie (without whipped cream topping) for up to 2 months. Wrap tightly in plastic wrap and aluminum foil. Thaw overnight in the refrigerator, then add fresh whipped cream and caramel drizzle before serving.
The baked crust can be frozen separately for up to 3 months. The custard filling doesn’t freeze as well due to its dairy content, but the results are still acceptable if properly wrapped.
Make-Ahead Strategy
For stress-free entertaining, bake the crust up to 2 days ahead and store at room temperature wrapped in plastic wrap. Make the caramel custard filling 1-2 days ahead and store in a bowl (with plastic pressed on the surface) in the refrigerator. Fill the crust the day before serving.
Make the whipped cream topping no more than 4 hours before serving for best texture. The caramel drizzle can be made several days ahead and stored in the refrigerator—just gently rewarm before drizzling.
Troubleshooting Your Caramel Cream Pie
The Caramel Crystallized
Crystallization happens when sugar crystals form on the sides of the pan and fall back into the cooking sugar. To prevent this, make sure all the sugar is moistened with water at the start, don’t stir once it boils, and you can brush down the sides of the pan with a wet pastry brush to dissolve any crystals.
If crystallization happens, you’ll need to start over—there’s no way to fix it once it occurs.
The Caramel Seized When I Added Liquid
When you add cool liquid to hot caramel, it often hardens into a solid mass. Don’t panic! Simply return the pan to low heat and whisk gently—the caramel will dissolve back into the liquid within a few minutes. This is why warming your milk and cream first helps minimize this effect.
The Custard Has Lumps
Lumps usually mean the eggs cooked too quickly or weren’t tempered properly. Always strain the custard through a fine-mesh sieve before filling the pie—this removes any lumps. Prevention involves tempering carefully and whisking constantly while cooking.
The Custard Didn’t Thicken
If your custard stayed thin, it either wasn’t cooked long enough or to a high enough temperature. The mixture must come to a full boil and cook for 2 minutes while boiling to fully activate the cornstarch. Make sure you’re using fresh cornstarch—old cornstarch loses its thickening power.
The Pie Filling Is Too Runny When Sliced
Runny filling means insufficient chilling time. The custard needs at least 4 hours to set properly, but overnight is better. Make sure your refrigerator is cold enough (below 40°F). If you sliced too soon, return it to the refrigerator for several more hours.
The Whipped Cream Is Weeping
Weeping (liquid pooling) happens when whipped cream sits too long or wasn’t whipped to stiff enough peaks. Add the whipped cream closer to serving time, make sure you beat it to stiff peaks, and consider adding a stabilizer like a tablespoon of powdered milk or cream of tartar while whipping.
The Crust Got Soggy
Soggy crust results from adding filling before the crust is completely cooled, or from moisture migrating from the filling over time. Always cool the crust completely before filling. For extra protection, brush the cooled crust with melted white chocolate before adding the filling—this creates a moisture barrier.
Frequently Asked Questions About Caramel Cream Pie
Can I use a different type of crust?
Absolutely! Graham cracker crust, shortbread cookie crust, or even an Oreo crust would all be delicious with caramel filling. Just make sure whatever crust you use is fully baked and cooled before adding the custard.
What’s the difference between caramel cream pie and butterscotch cream pie?
While similar, caramel is made from caramelized white sugar, giving it a deeper, slightly bitter complexity. Butterscotch is made with brown sugar and has a more buttery, molasses-like flavor. Both are delicious, but caramel has more sophisticated depth.
Can I make this pie ahead of time?
Yes! This pie actually benefits from being made ahead. Make it 1-2 days before serving and keep refrigerated. Add the whipped cream topping 2-4 hours before serving for best appearance and texture.
Why do I need to warm the milk and cream?
Warming the dairy before adding it to the hot caramel prevents the caramel from seizing into a hard mass. Cold liquid added to extremely hot sugar causes rapid temperature change that can harden the caramel instantly.
Can I use store-bought caramel sauce instead of making my own?
While you could thin store-bought caramel sauce with milk and thicken it with cornstarch and eggs, homemade caramel provides superior flavor and texture. Store-bought often contains stabilizers and doesn’t have the same depth. If you’re short on time, look for high-quality jarred dulce de leche as a compromise.
How do I prevent a skin from forming on the custard?
Press plastic wrap directly onto the surface of the hot custard, making sure it touches everywhere with no air pockets. This prevents exposure to air, which causes skin formation. Don’t skip this step!
Can I make individual caramel cream pies?
Yes! Use tartlet pans or large muffin tins lined with pastry. Reduce the baking time for smaller crusts to about 12-15 minutes. Divide the custard among the individual crusts and chill. Top each with a dollop of whipped cream and drizzle.
What if I don’t have pie weights for blind baking?
Use dried beans, rice, or even sugar as pie weights. Line the crust with parchment or foil, fill with your weight substitute, and bake. These makeshift weights can be reused for baking but shouldn’t be cooked and eaten afterward.
Conclusion
This caramel cream pie represents everything I love about classic American desserts—it’s nostalgic yet sophisticated, comforting yet impressive, and most importantly, absolutely delicious. There’s something deeply satisfying about creating a dessert this beautiful and complex-tasting in your own kitchen. The process of caramelizing sugar, creating silky custard, and assembling it all into a stunning pie feels like real baking artistry.
What makes this recipe truly special is how it transforms simple ingredients—sugar, butter, eggs, cream—into something extraordinary through technique and care. That moment when you slice into the pie and see those perfect layers, then taste that velvety caramel custard against the crisp crust and fluffy cream, makes every step of the process worthwhile.
I’ve served this pie at countless gatherings over the years, and it never fails to elicit amazed reactions. People are genuinely surprised when I tell them it’s homemade, assuming something this elegant must have come from a professional bakery. That reaction never gets old, and I love being able to share the recipe so others can experience the same joy.
Don’t let the multiple steps intimidate you. Yes, this pie requires some time and attention, but each component is straightforward when broken down. The caramel might seem scary if you’ve never made it, but once you understand the process, you’ll find it’s actually quite forgiving. The custard is a basic technique that’s useful for countless other recipes. And the assembly is simple and satisfying.
Whether you’re making this for Thanksgiving, a special celebration, or just because you’re craving something extraordinary, I promise this caramel cream pie will not disappoint. It’s become one of my signature desserts, requested again and again by family and friends. Now it’s your turn to create this magic in your own kitchen. Happy baking, and enjoy every silky, caramel-infused bite!