The first time my Nonna taught me to make Italian torrone, I was twelve years old and convinced I would mess it up. We stood in her tiny kitchen on a cold December morning, the windows fogged with steam, while she patiently showed me how to stir the honey mixture with her old wooden spoon. “Pazienza,” she kept saying – patience. That lesson has stayed with me through every batch of torrone I’ve made since.
The Magic of Homemade Italian Torrone
Italian torrone is more than just candy – it’s a celebration of simplicity and tradition. This honey-based nougat studded with toasted nuts represents everything beautiful about Italian desserts: quality ingredients, patience, and love. When you bite into a piece of homemade torrone, you get that perfect contrast of chewy sweetness from the honey-nougat base and the satisfying crunch of roasted nuts.
Making Italian torrone at home might seem intimidating, but I promise you, it’s more accessible than you think. Yes, it requires some stirring and patience, but the process is meditative and the results are absolutely spectacular. My family has been making this torrone recipe for generations, and now I’m sharing it with you.
Understanding Traditional Italian Torrone
Italian torrone has ancient roots dating back to Roman times when honey and nuts were commonly served as dessert. The version we know today became famous in Cremona during a royal wedding in 1441. Different regions of Italy have their own variations – some hard and crunchy, others soft and chewy.
This torrone recipe creates a soft, pliable nougat that’s not too hard on your teeth but still has that satisfying chew. The honey provides natural sweetness and that distinctive flavor that makes torrone so special. Combined with perfectly roasted nuts and a touch of vanilla, it’s a confection that tastes like pure Italian tradition.
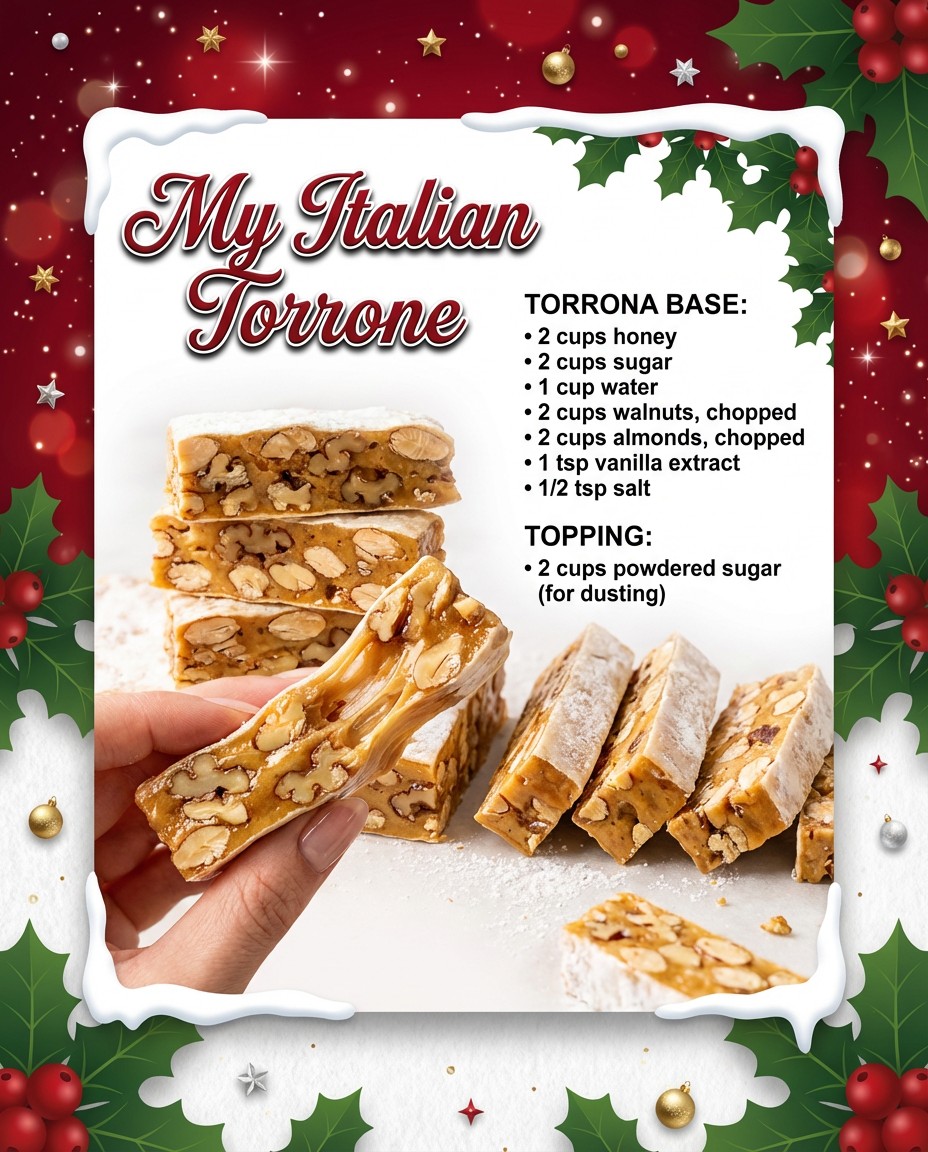
Essential Ingredients for Perfect Italian Torrone
The beauty of Italian torrone lies in its simplicity. You need just a handful of quality ingredients to create something extraordinary:
Torrone Base:
- 2 cups honey
- 2 cups granulated sugar
- 1 cup water
- 2 cups walnuts, chopped
- 2 cups almonds, chopped
- 1 teaspoon vanilla extract
- ½ teaspoon salt
For Dusting:
- 2 cups powdered sugar
The quality of your honey makes a huge difference in the final flavor of your Italian torrone. I recommend using a light, floral honey like clover or wildflower. Darker honeys like buckwheat can overpower the delicate nuttiness. Local honey adds an extra special touch and supports local beekeepers.
Selecting and Preparing Nuts for Torrone
The nuts are the soul of Italian torrone, so choosing and preparing them properly is crucial. I use a combination of walnuts and almonds because I love how their flavors complement each other. Walnuts bring an earthy richness, while almonds add a sweet, mild crunch.
Chop your nuts to medium-sized pieces – not too fine, but not huge chunks either. You want each bite of torrone to have plenty of nut pieces without them being unwieldy. I find that roughly chopping them by hand gives you better control over the size than using a food processor, which can turn some pieces to powder while leaving others too large.
Step-by-Step Guide to Making Italian Torrone
Making Italian torrone is a labor of love, but the process is straightforward when you break it down into steps. I’ve made this recipe countless times, and I’ve learned all the tricks to ensure success.
Preparing Your Workspace
Before you begin cooking, prepare your workspace. Line a large baking sheet with parchment paper and have it ready nearby. Measure out your powdered sugar and place it in a shallow dish or on another piece of parchment paper. Have your vanilla extract measured and within reach – you’ll need to add it quickly at the end.
This preparation is essential because once your torrone mixture is ready, you need to work fast. Having everything in place prevents panic and ensures smooth execution.
Creating the Honey-Sugar Syrup
In a large, heavy-bottomed pot, combine the honey, sugar, and water. The pot should be at least 4 quarts because the mixture will bubble up considerably as it cooks. Place it over medium heat and stir continuously with a wooden spoon.
At first, the mixture will look like cloudy honey water. As it heats, the sugar will dissolve and the mixture will become clear. This initial stage takes about 10 minutes. Keep stirring – this prevents the sugar from crystallizing on the sides of the pot and ensures even heating.
The Crucial Cooking Stage
Once the mixture comes to a boil, reduce the heat slightly to maintain a gentle boil. Continue stirring constantly. The mixture will start to thicken and become more viscous. This is where patience really comes into play – you’ll be stirring for about 15-20 minutes total.
The mixture is ready when it reaches the hard-ball stage (around 260°F or 127°C if you’re using a candy thermometer). If you don’t have a thermometer, you can test it by dropping a small amount into cold water – it should form a firm ball that holds its shape but is still pliable.
I learned from my Nonna that the color is also a good indicator. The mixture should turn a rich, golden amber color, darker than the original honey but not brown. This caramelization adds depth of flavor to your Italian torrone.
Adding the Nuts and Finishing Touches
Once your syrup reaches the right temperature and color, immediately remove the pot from heat. Quickly stir in the vanilla extract and salt – the mixture will bubble vigorously, so be careful. Then add all of your chopped walnuts and almonds at once.
Stir quickly and thoroughly to coat every piece of nut with the honey-sugar mixture. You need to work fast here because the mixture starts to set as it cools. Make sure the nuts are evenly distributed – you don’t want all the nuts sinking to one side.
Shaping Your Italian Torrone
Pour the hot torrone mixture onto your prepared parchment-lined baking sheet. Using a greased spatula or the back of a spoon, quickly spread it into an even layer about ½ to ¾ inch thick. Don’t worry about making it perfectly rectangular – rustic edges are part of homemade torrone’s charm.
While the torrone is still warm and pliable (but not so hot that you burn yourself), you can shape it a bit more. I like to create a rough rectangle that’s easy to cut into bars later. Work quickly – torrone sets faster than you’d expect.
Cooling and Dusting with Powdered Sugar
Let your Italian torrone cool at room temperature for about 10-15 minutes. It should still be slightly warm but firm enough to handle. This is the perfect time to dust it with powdered sugar.
Generously dust the top of your torrone with powdered sugar, then carefully flip it over and dust the other side. The powdered sugar serves two purposes: it prevents sticking and adds a beautiful, snowy appearance that’s traditional for Italian torrone. It also makes the torrone less sticky to handle and easier to cut.
Cutting Italian Torrone into Perfect Pieces
Once your torrone is completely cool (this takes about 30 minutes to an hour), it’s time to cut it. Use a large, sharp knife and cut with a firm, decisive motion. A heavy chef’s knife works best because its weight helps cut through the nuts cleanly.
I cut my Italian torrone into bars about 1 inch wide and 3-4 inches long, similar to candy bars. You can also cut it into squares if you prefer. Between cuts, wipe your knife with a damp cloth to keep it from getting sticky. Some people heat their knife briefly under hot water – this can help with cutting, but make sure to dry it thoroughly first.
Storing Italian Torrone for Maximum Freshness
Proper storage keeps your Italian torrone fresh and delicious. Wrap individual pieces in parchment paper or wax paper, then store them in an airtight container at room temperature. Stored this way, torrone will keep for up to three weeks.
I don’t recommend refrigerating Italian torrone because the moisture can make it sticky and change the texture. A cool, dry pantry or cupboard is perfect. If you live in a very humid climate, you might want to store it with a small packet of food-safe silica gel to absorb excess moisture.
For longer storage, you can freeze torrone for up to three months. Wrap pieces individually in plastic wrap, then place them in a freezer-safe container. Thaw at room temperature before serving.
Creative Variations on Classic Italian Torrone
While traditional Italian torrone is perfect as is, there are some wonderful variations you can try once you’ve mastered the basic recipe:
Chocolate-Dipped Torrone: Melt dark chocolate and dip one end of each torrone bar. Let the chocolate set on parchment paper. The combination of honey-nougat and dark chocolate is absolutely divine.
Pistachio Torrone: Replace half or all of the walnuts and almonds with pistachios for a gorgeous green-studded torrone with a delicate flavor. This variation is popular in Sicily.
Citrus-Scented Torrone: Add the finely grated zest of one orange or lemon along with the vanilla. The citrus brightens the honey flavor and adds complexity.
Nutritional Information for Italian Torrone
Per serving (one 1-ounce bar, approximately 28g):
- Calories: 145
- Total Fat: 7g
- Saturated Fat: 0.7g
- Cholesterol: 0mg
- Sodium: 45mg
- Total Carbohydrates: 20g
- Dietary Fiber: 1.2g
- Sugars: 17g
- Protein: 3g
Italian torrone is high in natural sugars from honey, but it also provides healthy fats and protein from the nuts. The lack of dairy makes it naturally suitable for those avoiding lactose.
Presenting Italian Torrone as a Gift
Italian torrone wrapped in parchment paper and tied with twine makes an incredibly elegant and thoughtful gift. I like to wrap individual bars and arrange them in a decorative box or basket. Include a small card explaining that it’s homemade Italian torrone – people are always impressed by homemade candy.
For holiday gifting, you can use festive parchment paper or add small sprigs of rosemary or dried citrus slices to the packaging. The rustic, artisanal appearance of homemade torrone makes it feel special and luxurious.
Perfect Pairings with Italian Torrone
Italian torrone pairs beautifully with espresso or strong coffee. The bitterness of the coffee balances the sweetness of the honey, creating a perfect afternoon treat. My Nonna always served torrone with espresso after dinner during the holidays.
For wine pairings, try a sweet dessert wine like Vin Santo or Moscato d’Asti. The wine’s sweetness complements the torrone without competing with it. A glass of Amaretto or other nut-flavored liqueur is also traditional.
Torrone is also wonderful served alongside fresh fruit. The natural acidity of oranges, pears, or grapes provides a refreshing contrast to the sweet, dense candy.
The Cultural Significance of Italian Torrone
In Italy, torrone is deeply connected to Christmas and holiday celebrations. Families gather to make it together, passing down recipes and techniques through generations. The candy symbolizes abundance and celebration, making it a staple on holiday dessert tables throughout Italy.
Different regions have their own torrone traditions. Cremona claims to be the birthplace of modern torrone and hosts an annual torrone festival. In Benevento, they make a softer version called “cupedia.” Sicilian torrone often features pistachios and almonds. Understanding these regional variations helps us appreciate the diversity of Italian culinary traditions.
Troubleshooting Common Italian Torrone Issues
Even experienced candy makers sometimes encounter issues with torrone. Here are solutions to common problems:
Torrone Too Soft: This usually means the mixture wasn’t cooked long enough. Next time, cook it a bit longer or to a higher temperature.
Torrone Too Hard: Overcooking or too high a temperature can make torrone rock-hard. It’s still edible, just harder to cut. Reduce cooking time slightly next time.
Nuts Not Sticking Together: This happens if the syrup wasn’t hot enough when you added the nuts. Make sure your syrup is at the hard-ball stage before adding nuts.
My Personal Italian Torrone Wisdom
After making dozens of batches of Italian torrone over the years, I’ve learned that the most important ingredient isn’t listed in the recipe – it’s patience. This isn’t a dessert you can rush. The stirring, the watching, the waiting – it’s all part of the process that transforms simple ingredients into something magical.
I also recommend making torrone on a dry day if possible. Humidity can affect how the candy sets and how long it stays fresh. In humid weather, your torrone might remain slightly sticky even after cooling completely.
Finally, don’t be discouraged if your first batch isn’t perfect. Like many traditional recipes, Italian torrone rewards practice. Each batch teaches you something about how the mixture looks and behaves at different stages. Keep notes on what worked and what didn’t, and adjust for next time.
Making Italian torrone connects me to my heritage and to my Nonna, who passed down this recipe with love. Every time I stir that pot of honey and watch it transform into golden candy, I remember her patience and her gentle insistence that good things take time. Now, whenever I share this torrone with friends and family, I’m sharing not just candy, but a piece of Italian tradition and family history. Buon appetito!