Last winter, my daughter came home from school absolutely enchanted by the melted snowman cookies her teacher had brought in. She begged me to make them together, and after researching various versions, I developed this Oreo ball recipe that’s become our annual holiday tradition. These adorable little snowmen are not only fun to make with kids, but they’re also delicious—combining the beloved flavor of Oreo balls with whimsical holiday decoration that brings smiles to everyone who sees them.
Why Melted Snowman Oreo Balls Are Perfect Holiday Treats
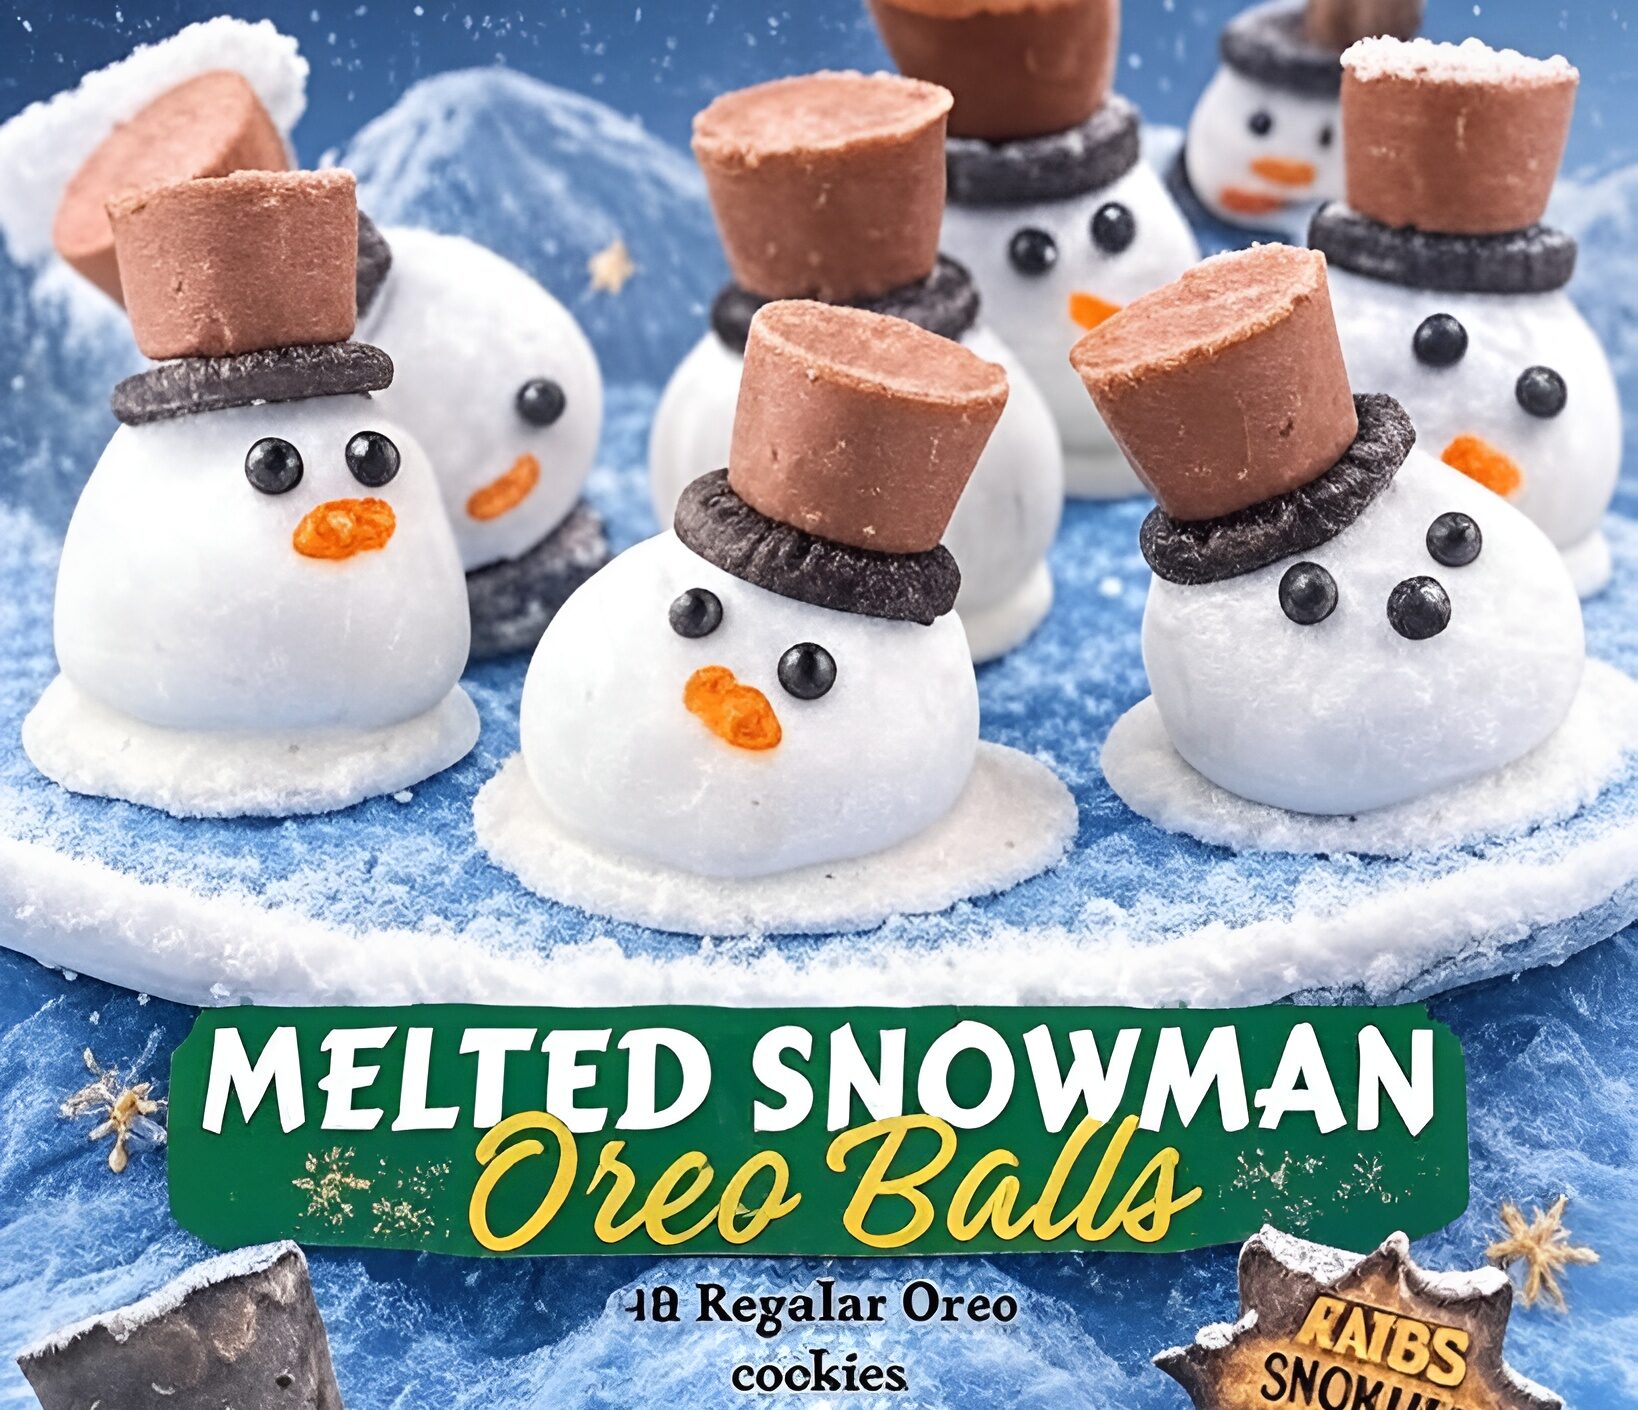
These snowman Oreo balls capture everything wonderful about holiday baking with children. They’re hands-on enough to keep kids engaged, simple enough that beginners can succeed, and cute enough to make impressive gifts or party contributions. The “melted” concept is particularly clever—it removes pressure to create perfect spheres since the slightly flattened, irregular shape actually makes them look more authentically melted.
What makes this Oreo ball recipe particularly appealing is how it combines two beloved treats. The rich, creamy Oreo ball interior tastes like the filling from chocolate cookies and cream pie, while the white chocolate coating provides sweetness and serves as the perfect canvas for your snowman decorations.
Understanding the Components of Snowman Treats
Making these adorable Christmas Oreo balls involves three main steps: creating the Oreo mixture, forming and coating the balls, then decorating them as snowmen. Each step builds on the previous one, and none requires advanced baking skills. Children as young as five can help with various stages, making this an excellent family activity.
The Oreo and cream cheese mixture holds together beautifully, making it easy to form into balls that maintain their shape. The vanilla almond bark coating sets quickly and provides a stable surface for adding decorative elements like the hat, face, and other snowman features.
Essential Ingredients for Melted Snowman Oreo Balls
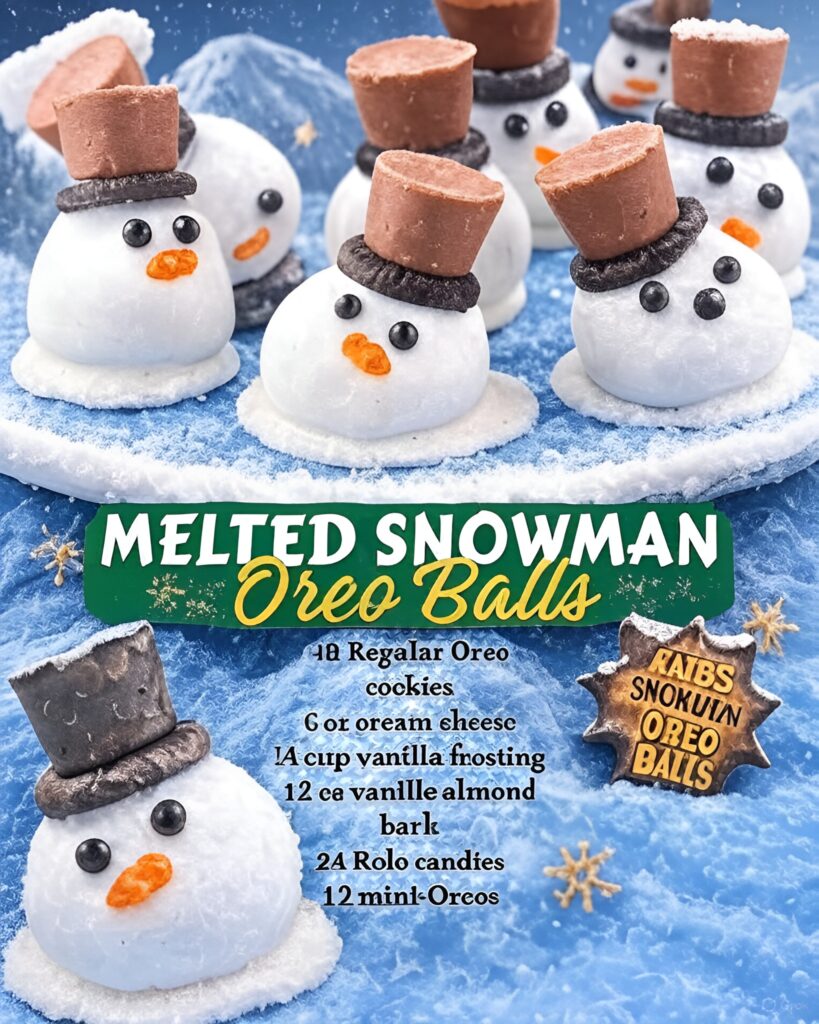
Here’s what you’ll need to create these festive treats:
- 1 package (36 cookies) regular Oreo cookies
- 6 oz cream cheese, softened
- ¼ cup vanilla frosting (store-bought or homemade)
- 12 mini vanilla almond bark pieces (for coating)
- 24 Rolo candies (for snowman hats)
- 12 mini Oreos (for hat brims)
Additional decorating supplies you’ll need:
- Black decorating gel or black icing
- Orange decorating gel or orange candy melts (for noses)
- Optional: white sanding sugar for snow effect
These ingredients combine to create approximately 12 large snowman Oreo balls, though you can make them smaller for more servings. The specific candies create the classic snowman appearance everyone recognizes.
Step-by-Step Instructions for Making Snowman Oreo Balls
Creating the Oreo Mixture
Begin by crushing the entire package of Oreo cookies into fine crumbs. You can do this in a food processor, which is quickest, or place the cookies in a sealed plastic bag and crush them with a rolling pin. For the best texture, process until the crumbs are very fine with no large chunks remaining.
In a large bowl, combine the Oreo crumbs with the softened cream cheese and vanilla frosting. Mix thoroughly using a sturdy spoon or your hands until the mixture holds together when pressed. The mixture should be evenly moistened throughout with no dry pockets of cookie crumbs.
If your mixture seems too dry and crumbly, add another tablespoon of frosting. If it’s too wet and sticky, add a few more crushed Oreos or refrigerate it for 15 minutes to firm up.
Forming the Snowman Bodies
Line a baking sheet with parchment paper. Scoop out portions of the Oreo mixture using a cookie scoop or large spoon, using about 2-3 tablespoons for each snowman. Roll each portion between your palms to form a ball.
Here’s where the “melted snowman” concept helps—don’t worry about making perfect spheres. In fact, slightly flatten each ball on your work surface to create that puddle-like melted appearance. The irregular, organic shapes actually make them look more authentically melted.
Place the formed balls on your prepared baking sheet and refrigerate for at least 30 minutes, or freeze for 15 minutes. They need to be thoroughly chilled to prevent them from falling apart when you dip them in melted chocolate.
Melting the Vanilla Coating
Break the vanilla almond bark into pieces and place them in a microwave-safe bowl. Microwave in 30-second intervals at 50% power, stirring thoroughly after each interval, until completely melted and smooth.
The chocolate should be fluid enough to coat smoothly but not so hot that it melts the Oreo balls. If it seems too thick, you can stir in a teaspoon of vegetable oil to thin it slightly.
Coating the Snowman Oreo Balls
Remove a few chilled Oreo balls from the refrigerator at a time, keeping the rest cold. Using a fork or dipping tool, dip each ball into the melted vanilla coating, turning to ensure it’s completely covered.
Lift the ball with your fork, allowing excess coating to drip back into the bowl. Gently tap the fork on the edge of the bowl to remove more excess—this prevents thick pooling at the base.
Slide the coated ball onto a parchment-lined baking sheet. While the coating is still wet, sprinkle with white sanding sugar if desired for a snowy effect. Work quickly, as the coating sets fast.
Creating the Snowman Decorations
While the vanilla coating is still wet (you have about 30-60 seconds), place a mini Oreo cookie on top of each ball for the hat brim. Position it near one edge of the ball, slightly off-center, to create that jaunty melted appearance.
Top each mini Oreo with a Rolo candy to complete the top hat. Press down gently but firmly to ensure they adhere to the coating.
Once all snowmen have their hats, refrigerate the baking sheet for 15 minutes to set the chocolate completely.
Adding Facial Features
Using black decorating gel or black icing fitted with a small round tip, add eyes and a mouth to each snowman. Traditional coal-button eyes work great—two dots positioned where the face would be on your flattened ball.
For the mouth, create a simple curved smile or add several small dots in an arc. Don’t overthink it—even imperfect features add to the handmade charm.
For the carrot nose, use orange decorating gel to create a small triangle or dot in the center of the face. You can also use small pieces of orange candy melts or fondant if you prefer a more three-dimensional nose.
Nutritional Information
Per snowman Oreo ball:
- Calories: 285
- Total Fat: 14g
- Saturated Fat: 7g
- Cholesterol: 15mg
- Sodium: 190mg
- Total Carbohydrates: 38g
- Dietary Fiber: 1g
- Sugars: 28g
- Protein: 3g
Creative Variations for Snowman Treats
Peppermint Snowman Oreo Balls
Add ½ teaspoon of peppermint extract to the Oreo mixture before forming balls. Use crushed peppermint candies instead of sanding sugar for a festive peppermint flavor throughout.
Chocolate Snowman Oreo Balls
Use chocolate almond bark for coating instead of vanilla for darker “snow” men. This creates a nice variation and uses different Oreo colors for diversity on your serving platter.
Mini Snowman Bites
Make smaller Oreo balls using just 1 tablespoon of mixture each. Use mini chocolate chips for hats and candy eyes for features. These bite-sized versions are perfect for parties where guests want to sample multiple treats.
Frosty’s Family
Create female snowmen by using different candy decorations—perhaps chocolate kisses as hats or adding colorful candy “scarves” made from fruit roll-ups cut into strips.
Tips for Perfect Snowman Oreo Balls
Room temperature cream cheese is absolutely essential. Cold cream cheese won’t blend smoothly with the cookie crumbs and will create a lumpy, difficult-to-form mixture. Plan ahead and leave it out for at least an hour before starting.
Chill the formed balls thoroughly before dipping. This step prevents them from falling apart in the melted coating and makes the entire dipping process much easier and neater.
Work quickly when adding decorations. The almond bark coating sets fast, so have all your decorating supplies laid out and ready before you start coating balls. If the coating hardens before you add decorations, they won’t stick.
Making Snowman Treats with Children
This recipe is wonderful for involving kids in holiday baking. Young children can help crush cookies (especially in a sealed bag), mix ingredients, and add decorative features. Older children can handle the entire process with supervision during the melting and dipping steps.
Assign age-appropriate tasks: preschoolers can add eyes and mouths, elementary-age kids can place hats, and teens can handle the dipping. Everyone feels accomplished seeing their melted snowmen come to life.
The forgiving nature of these treats—where imperfection actually enhances the melted look—removes pressure and lets kids enjoy the creative process without worry.
Storage and Make-Ahead Options
Store completed snowman Oreo balls in an airtight container in the refrigerator for up to 1 week. Layer them between sheets of parchment paper to prevent sticking and protect the decorations.
The undecorated coated balls can be made several days ahead and decorated closer to your event. This spreads out the work and ensures the decorated faces look fresh.
These snowmen freeze beautifully for up to 2 months. Freeze them in a single layer first, then transfer to freezer containers. Thaw in the refrigerator for several hours before serving.
Serving Suggestions for Holiday Parties
Arrange melted snowman Oreo balls on a platter “melting” in shredded coconut or white sanding sugar to create a snowy scene. Add a few peppermint sticks or candy canes as props for a complete winter wonderland presentation.
For children’s parties, create place cards by writing names on small flags (toothpicks with paper) and inserting them into each snowman. Kids love having personalized treats.
Serve them on individual small plates or in cupcake liners for easy handling at parties. The liners also protect little hands from chocolate smudges.
Perfect Occasions for Snowman Oreo Balls
These adorable treats are ideal for:
- Christmas parties and open houses
- School holiday celebrations
- Kids’ winter birthday parties
- Classroom treats
- Neighbor gifts
- Holiday bake sales
- Family movie nights during December
Presentation Ideas for Maximum Cuteness
Create a melting snowman scene on your serving platter. Arrange the snowmen at various angles, some tipped over, to enhance the melted effect. Add white chocolate drizzle around them as “melted snow” and scatter mini chocolate chips as “coal.”
Package individual snowmen in clear treat bags tied with blue ribbon for adorable individual gifts. Attach a tag saying “Warm wishes!” or “Stay cool!” for a punny touch.
For parties, set up a “snowman building station” where guests can decorate their own. Provide coated balls, various candy options, and icing tubes so everyone creates their unique snowman.
Why This Recipe Works So Well
The cream cheese in the Oreo mixture serves multiple purposes—it adds richness, helps bind everything together, and keeps the centers soft and creamy even when refrigerated. This prevents the dry, crumbly texture that straight Oreo crumbs would have.
The addition of frosting provides extra moisture and sweetness while contributing to the smooth, truffle-like texture that makes these so much more than just cookie balls.
Using almond bark instead of chocolate chips creates a coating that sets quickly with a professional finish. The bark contains ingredients that help it harden glossy and smooth without tempering.
Troubleshooting Common Issues
If your Oreo mixture won’t hold together, it needs more moisture. Add frosting or cream cheese one tablespoon at a time until it’s cohesive. The mixture should hold a ball shape when squeezed without being wet or sticky.
If decorations won’t stick, your coating hardened too quickly. Use a tiny dab of melted almond bark as “glue” to attach them. Warm the bark for just a few seconds if needed.
If balls fall apart during dipping, they weren’t chilled long enough. Return them to the freezer for 15 more minutes and try again with colder centers.
The Charm of Imperfection
Remember, these are supposed to look melted, which means perfection isn’t the goal. Embrace crooked hats, lopsided faces, and irregular shapes—they all add to the whimsical charm of melted snowmen. Kids especially appreciate that there’s no “wrong” way to make them.
The handmade quality makes these treats feel special and personal rather than mass-produced. Each unique snowman has personality and character that perfectly manufactured treats lack.
My Personal Cooking Tip
Here’s my secret for the cutest melted snowman Oreo balls: after forming your balls and flattening them slightly, use your thumb to make a small indentation on one side before chilling. This creates a perfect little valley where you can “nestle” the mini Oreo hat at a jaunty angle, making them look even more authentically melted and giving each snowman more personality. When decorating the faces, position them to look in different directions by placing the eyes and mouth at various angles—this makes your platter look like a little snowman community rather than identical treats. For the most charming results, let your kids do most of the face decorating. Their natural instinct to make each one different creates variety that looks intentional and artisanal. Finally, here’s a trick for easier dipping: insert a toothpick into the bottom of each chilled ball before dipping. This gives you a handle to hold while coating, then you can use another toothpick to slide it off onto your parchment paper. Just remove the toothpick and smooth over the small hole with a bit of melted coating. This technique prevents fingerprints in the white coating and creates much cleaner results!