Introduction
The first time I made these mini chocolate peanut butter pies, I was preparing for a dinner party and wanted something special that could be made ahead. I’ve always been a sucker for the chocolate-peanut butter combination—it’s the ultimate flavor pairing that never disappoints. These adorable individual pies caught my eye because they’re not only incredibly delicious but also perfectly portioned and elegant enough for entertaining. Imagine a crunchy chocolate cookie crust, filled with creamy, dreamy peanut butter filling, and topped with a glossy layer of chocolate ganache. Each bite delivers that irresistible salty-sweet contrast that makes chocolate and peanut butter such beloved partners. What makes these mini pies even better is that they’re surprisingly simple to make, require no baking for the filling, and can be prepared a day or two in advance. Whether you’re hosting a special dinner, looking for a show-stopping dessert, or simply treating yourself to something extraordinary, these mini chocolate peanut butter pies are guaranteed to impress.
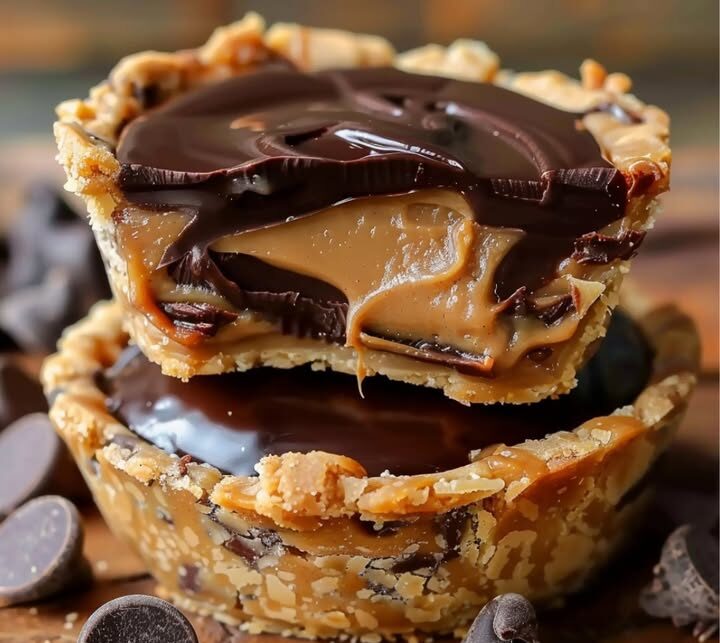
Why These Mini Chocolate Peanut Butter Pies Are Irresistible
The Perfect Chocolate and Peanut Butter Balance
These mini pies achieve that magical balance where neither chocolate nor peanut butter overpowers the other. The chocolate cookie crust provides a sturdy, slightly bitter foundation, the peanut butter filling is rich and creamy with just the right amount of sweetness, and the chocolate topping adds a smooth, luxurious finish.
Individual Portions Make Them Special
There’s something delightful about having your own personal dessert. These mini chocolate peanut butter pies eliminate the need for slicing and serving, making them perfect for parties. Plus, portion control is built right in—though I’ll admit, it’s tempting to have two!
No-Bake Convenience Meets Impressive Presentation
The filling requires no baking, which means less time in the kitchen and more time enjoying your gathering. Despite their simple preparation, these pies look absolutely stunning and taste like they came from a gourmet bakery.
Essential Ingredients for Mini Chocolate Peanut Butter Pies
Chocolate Cookie Crust
- 1½ cups chocolate cookie crumbs – Use Oreos (with filling removed), chocolate graham crackers, or chocolate wafer cookies
- ¼ cup unsalted butter, melted – Binds the crumbs together
- 2 tablespoons granulated sugar – Adds a touch of sweetness to balance the chocolate
- Pinch of salt – Enhances the chocolate flavor
For the Peanut Butter Filling
- 1 cup creamy peanut butter – Use regular, not natural style (natural separates too much)
- 8 ounces cream cheese, softened – Creates a smooth, mousselike texture
- 1 cup powdered sugar – Sweetens and helps stabilize the filling
- 1 teaspoon vanilla extract – Enhances overall flavor
- 1 cup heavy whipping cream, cold – Lightens the filling and adds volume
- 2 tablespoons powdered sugar (for whipping cream) – Stabilizes the whipped cream
Chocolate Ganache Topping
- 6 ounces semi-sweet or dark chocolate, chopped – Use good quality chocolate for best results
- ½ cup heavy whipping cream – Creates the silky ganache texture
- 1 tablespoon unsalted butter – Adds shine and smoothness
- 1 teaspoon vanilla extract – Rounds out the chocolate flavor
Optional Garnishes
- Mini peanut butter cups, chopped
- Sea salt flakes
- Chopped peanuts
- Chocolate shavings
- Whipped cream rosettes
Step-by-Step Instructions for Perfect Mini Chocolate Peanut Butter Pies
Preparing Your Muffin Tin and Liners
Line a 12-cup muffin tin with paper or foil cupcake liners. I prefer foil liners because they’re sturdier and peel away more cleanly from the finished pies. Make sure the liners are pressed firmly into the cups so they don’t shift while you’re working.
Making the Chocolate Cookie Crust
If using whole cookies like Oreos, scrape out and discard the filling, then pulse the chocolate cookies in a food processor until you have fine, even crumbs. If you don’t have a food processor, place the cookies in a zip-top bag and crush them with a rolling pin until finely ground.
In a medium bowl, combine the chocolate cookie crumbs, melted butter, sugar, and salt. Mix thoroughly with a fork until the mixture resembles wet sand and holds together when squeezed. Every crumb should be coated with butter—this is what holds the crust together.
Divide the crust mixture evenly among the 12 muffin cups, using about 2 tablespoons per cup. Press firmly into the bottom of each liner using the back of a spoon, a small glass, or a tart tamper. Really compact it—a firm crust won’t crumble when you bite into it. The crust should be about ¼-inch thick.
Place the muffin tin in the freezer for 15-20 minutes while you prepare the filling. This helps set the crust and makes it easier to add the filling without disturbing the base.
Creating the Creamy Peanut Butter Filling
This is where the magic happens! In a large mixing bowl, beat the softened cream cheese with an electric mixer on medium speed until completely smooth and fluffy, about 2 minutes. Make sure there are no lumps—scrape down the sides of the bowl as needed.
Add the peanut butter and beat until fully combined and creamy, another 2 minutes. The mixture should be smooth and well-blended. Add 1 cup of powdered sugar and the vanilla extract, beating on low speed until incorporated, then increase to medium speed and beat until light and fluffy.
In a separate cold bowl, whip the heavy cream with 2 tablespoons of powdered sugar until stiff peaks form. This usually takes 2-3 minutes with an electric mixer. The cream should hold its shape when you lift the beaters.
Gently fold about one-third of the whipped cream into the peanut butter mixture to lighten it. Then fold in the remaining whipped cream using a rubber spatula and gentle folding motions. Be careful not to deflate the whipped cream—you want to maintain that light, airy texture. The filling should be smooth, fluffy, and hold its shape.
Filling the Mini Chocolate Peanut Butter Pies
Remove the muffin tin from the freezer. Using a large spoon, ice cream scoop, or piping bag, divide the peanut butter filling evenly among the 12 crusts. If using a spoon, dollop a generous amount into each cup and smooth the top with the back of the spoon or a small offset spatula.
For a more professional look, transfer the filling to a piping bag fitted with a large round tip and pipe in a swirl pattern, or simply cut a large hole in the corner of a zip-top bag. Fill each cup to just below the rim of the liner—the filling will be topped with ganache, so leave a little room.
Use a small offset spatula or the back of a spoon to smooth the tops, creating an even surface for the chocolate ganache layer. Tap the muffin tin gently on the counter to release any air bubbles.
Place the filled pies back in the freezer for about 20-30 minutes while you prepare the chocolate ganache. This helps the filling set and prevents it from mixing with the warm ganache.
Making the Silky Chocolate Ganache
Place the chopped chocolate in a medium heatproof bowl. Make sure your chocolate is chopped into relatively small, uniform pieces for even melting.
In a small saucepan, heat the heavy cream over medium heat until it just begins to simmer—you’ll see small bubbles around the edges, but don’t let it come to a full boil. Immediately pour the hot cream over the chocolate and let it sit undisturbed for 2-3 minutes. This allows the heat to gently melt the chocolate.
After waiting, add the butter and vanilla extract, then whisk gently from the center outward until the mixture is completely smooth, glossy, and homogeneous. If you have stubborn chocolate pieces, place the bowl over a pot of simmering water (double boiler method) and stir gently until smooth.
Let the ganache cool for about 5-10 minutes, stirring occasionally. It should still be liquid enough to pour but not so hot that it melts the peanut butter filling. The ideal temperature is slightly warm to the touch.
Topping the Mini Pies with Chocolate Ganache
Remove the mini pies from the freezer. Spoon about 1-2 tablespoons of ganache onto each pie, using the back of the spoon to spread it evenly to the edges. The ganache should form a smooth, glossy layer that covers the peanut butter filling completely.
Alternatively, for a cleaner look, transfer the ganache to a squeeze bottle or spouted measuring cup and pour it carefully over each pie, starting from the center and working outward in a spiral motion.
If you’re adding garnishes like chopped peanut butter cups, chocolate shavings, or sea salt flakes, add them now while the ganache is still wet so they adhere properly.
Chilling and Setting the Mini Chocolate Peanut Butter Pies
Carefully transfer the muffin tin to the refrigerator and chill the pies for at least 3-4 hours, or until the ganache is completely set and the filling is firm. For best results, refrigerate overnight. The pies need this time to set properly so they hold their shape when you peel away the liners.
Once fully chilled and set, remove the pies from the muffin tin and peel away the paper liners. If using foil liners, they should peel away cleanly. If the liners stick slightly, refrigerate for another hour.
Expert Tips for the Best Mini Chocolate Peanut Butter Pies
Choose the Right Peanut Butter
Use regular, commercial creamy peanut butter like Jif or Skippy—not natural or organic varieties. Natural peanut butter separates and has too much oil, which can make the filling unstable and greasy. If you only have natural peanut butter, drain off some of the oil first.
Temperature Matters for Smooth Filling
The cream cheese must be softened to room temperature for a smooth, lump-free filling. If it’s too cold, you’ll have chunks that are difficult to incorporate. Take it out of the refrigerator at least one hour before starting.
Don’t Overwhip the Cream
Whip the cream only until stiff peaks form. If you overwhip, it can become grainy or even turn to butter, which will give your filling an unpleasant texture. Watch it carefully—it happens quickly!
Fold Gently to Keep It Light
When incorporating the whipped cream into the peanut butter mixture, use gentle folding motions rather than stirring. This preserves the air bubbles that make the filling light and fluffy instead of dense.
Make Clean Ganache
For perfectly smooth ganache, make sure no water gets into the chocolate—even a single drop can cause it to seize and become grainy. Use completely dry bowls and utensils.
Nutritional Information for Mini Chocolate Peanut Butter Pies
Per serving (1 mini pie, recipe makes 12):
- Calories: 425
- Total Fat: 32g
- Saturated Fat: 14g
- Trans Fat: 0g
- Cholesterol: 45mg
- Sodium: 215mg
- Total Carbohydrates: 32g
- Dietary Fiber: 2g
- Sugars: 25g
- Protein: 7g
- Vitamin A: 12% DV
- Calcium: 5% DV
- Iron: 8% DV
Note: Nutritional information is approximate and will vary based on specific brands and ingredients used.
Serving Suggestions for Mini Chocolate Peanut Butter Pies
When to Serve These Mini Pies
These mini chocolate peanut butter pies are perfect for dinner parties, holiday gatherings, birthday celebrations, potlucks, buffets, wedding showers, game day desserts, or any time you want an impressive individual dessert. They’re particularly popular during summer months because they don’t require oven time and are served chilled.
How to Present Mini Chocolate Peanut Butter Pies
Arrange the mini pies on a tiered dessert stand for an elegant presentation. Place each pie on a small dessert plate with a dollop of whipped cream and fresh berries on the side. Dust the serving platter lightly with cocoa powder for a professional touch. Set them on small squares of parchment paper on a serving tray for easy grabbing at buffets.
Perfect Pairings with Chocolate Peanut Butter Pies
Serve with cold milk for a classic combination, hot coffee to balance the richness, or dessert wine like port or cream sherry. For a special touch, pair with peanut butter whiskey or chocolate liqueur. Fresh raspberries or strawberries on the side provide a tart contrast that cuts through the richness.
Creative Variations of Mini Chocolate Peanut Butter Pies
Salted Caramel Chocolate Peanut Butter Pies
Drizzle salted caramel sauce over the ganache layer and sprinkle with flaky sea salt. You can also swirl caramel into the peanut butter filling for caramel throughout. This sweet-and-salty combination is absolutely divine.
Banana Chocolate Peanut Butter Pies
Layer thin banana slices over the crust before adding the peanut butter filling. The banana adds freshness and a different flavor dimension that complements both chocolate and peanut butter beautifully—like a grown-up version of Elvis’s favorite sandwich.
S’mores Peanut Butter Pies
Replace the chocolate cookie crust with graham cracker crust, fold mini marshmallows into the peanut butter filling, and top with toasted marshmallows instead of ganache. Use a kitchen torch to toast the marshmallow topping for that authentic s’mores experience.
White Chocolate Peanut Butter Pies
Replace the dark chocolate ganache with white chocolate ganache. White chocolate pairs wonderfully with peanut butter and creates a sweeter, creamier finish. Top with crushed pretzels for added texture and saltiness.
Nutella Swirl Peanut Butter Pies
Swirl Nutella through the peanut butter filling before piping into the crusts. The hazelnut-chocolate spread adds another layer of flavor complexity that chocolate-lovers will adore.
Peanut Butter Cup Pies
Press a mini Reese’s peanut butter cup into the bottom of each crust before adding the filling, and top with chopped peanut butter cups after adding the ganache. It’s peanut butter cup heaven!
Storage Instructions for Mini Chocolate Peanut Butter Pies
Refrigerator Storage
Store the mini chocolate peanut butter pies in an airtight container in the refrigerator for up to 5 days. Layer them carefully with parchment paper between layers if stacking to prevent the ganache from smudging. They actually taste even better after sitting for a day, as the flavors meld together beautifully.
Freezing Mini Chocolate Peanut Butter Pies
These pies freeze exceptionally well! After the pies are completely set, place them in a single layer in a freezer-safe container with parchment paper between layers. Freeze for up to 3 months. To serve, transfer to the refrigerator and thaw for 2-3 hours, or let sit at room temperature for 30-45 minutes.
Make-Ahead Strategy
For stress-free entertaining, make these mini pies 2-3 days in advance. They actually benefit from the extra chilling time, which allows the flavors to develop and the texture to become perfectly creamy. Just keep them well-covered in the refrigerator until ready to serve.
Troubleshooting Your Mini Chocolate Peanut Butter Pies
The Crust Is Crumbly and Falls Apart
This means the crust wasn’t packed firmly enough or didn’t have enough butter. Make sure every crumb is coated with melted butter and really press down hard when forming the crust. The freezing step also helps it set properly.
The Filling Is Too Thick or Dense
This usually happens if the whipped cream was deflated during folding, or if the cream cheese was too cold and formed lumps. Make sure your cream cheese is truly softened, and fold the whipped cream in very gently to preserve the air.
The Filling Is Too Runny
Runny filling typically means the whipped cream wasn’t whipped to stiff peaks, or too much liquid was added. Make sure you whip the cream until it holds firm peaks. Also, measure your peanut butter carefully—too much can thin the filling.
The Ganache Won’t Set
If your ganache stays liquid after refrigerating, it might have too high a cream-to-chocolate ratio. Next time, use slightly less cream or more chocolate. In the meantime, return the pies to the refrigerator—it will eventually set, just more slowly.
The Ganache Is Grainy or Separated
This is called “seizing” and happens when water gets into the chocolate or if the chocolate was overheated. Make sure all utensils are completely dry, and don’t let the cream boil. If it happens, try whisking in a tablespoon of warm cream to bring it back together.
The Pies Are Hard to Remove from Liners
This means they need more chilling time. Refrigerate for another hour and try again. Foil liners tend to release more easily than paper ones. You can also run a small knife around the edge between the pie and liner to help release it.
Frequently Asked Questions About Mini Chocolate Peanut Butter Pies
Can I use crunchy peanut butter instead of creamy?
While you can use crunchy peanut butter, it will change the texture of the filling significantly. The peanut pieces can make it harder to achieve that smooth, mousse-like consistency. If you love crunch, I’d suggest using creamy peanut butter and sprinkling chopped peanuts on top instead.
What can I substitute for cream cheese?
Mascarpone cheese works beautifully as a substitute and creates an even richer, creamier filling. Greek yogurt can be used for a lighter, tangier version, though the texture will be less rich. Avoid using low-fat substitutes as they don’t set up properly.
Can I make these without a muffin tin?
Yes! You can use individual tart pans with removable bottoms, small springform pans, or even make them in small mason jars or glass dessert cups. The portions will be different, so adjust accordingly.
How do I know when the ganache is the right consistency to pour?
The ganache should coat the back of a spoon and slowly drip off when lifted. It should be warm enough to pour smoothly but not so hot that it melts the peanut butter filling. If it’s too thick, warm it gently; if too thin, let it cool a bit more.
Can I make one large pie instead of mini pies?
Absolutely! Use a 9-inch pie pan, increase the crust ingredients by 50%, double the filling and ganache, and adjust chilling time to 6-8 hours or overnight. The technique remains the same, just scaled up.
What’s the best way to transport these pies?
Keep them chilled until the last moment, transport in a cooler with ice packs, and keep them in their muffin tin or transfer to a flat, sturdy container. They’re quite stable once set, but avoid leaving them in warm temperatures for extended periods.
Can I make these dairy-free?
Yes, with some substitutions. Use dairy-free cream cheese, coconut cream (chilled and whipped) instead of heavy cream, and dairy-free chocolate for the ganache. The texture will be slightly different but still delicious.
Conclusion
These mini chocolate peanut butter pies have become one of my signature desserts, and it’s easy to see why. The combination of that crunchy chocolate crust, silky peanut butter filling, and glossy ganache topping creates a dessert experience that’s truly special. What makes them even better is how they make entertaining effortless—you can make them days ahead, and they’re already perfectly portioned for serving.
I love watching people’s faces when they take their first bite. There’s usually a moment of surprise at how perfectly balanced the flavors are, followed by that satisfied smile that comes from enjoying something truly delicious. The chocolate and peanut butter combination is universally loved, and presenting it in this elegant individual format elevates it from everyday treat to something memorable.
Whether you’re an experienced baker or just starting out, these mini pies are surprisingly simple to master. The no-bake filling means there’s no stress about oven temperatures or baking times, and the individual format means no worrying about creating perfect slices. Your biggest challenge might be making enough—these tend to disappear quickly!
Don’t hesitate to make these your own by trying the variations or adding your favorite toppings. Some of my best versions have come from spontaneous additions like a sprinkle of toffee bits or a drizzle of caramel. The base recipe is forgiving and welcomes creativity.
So grab your ingredients, line that muffin tin, and get ready to create a dessert that will have everyone asking for the recipe. These mini chocolate peanut butter pies prove that the best things really do come in small packages. Happy baking—or should I say, happy no-baking!