Ever wonder how to transform simple spring vegetables into a restaurant-worthy, soul-satisfying meal in under 30 minutes? The answer lies in a Strozzapreti pasta, but today, we’re diving into its creamy, vibrant cousin: Focus keyword. This isn’t just another rice dish; it’s a masterclass in texture, timing, and the pure, fresh flavors of the season. Cooking this at home means you control every ingredient—using the best olive oil, the freshest peas, and perfectly al dente rice—guaranteeing a depth of flavor no boxed mix can match. It’s a therapeutic process that connects you to your food and results in a stunning dish perfect for a weeknight or a special occasion. Let’s unlock the secrets to a flawless spring risotto.
Materials & Supplies (H2)
Ingredients:
- Base: 1 medium shallot or 1/2 yellow onion, finely diced; 2 cloves garlic, minced; 1 ½ cups (300g) arborio rice (or carnaroli for extra creaminess).
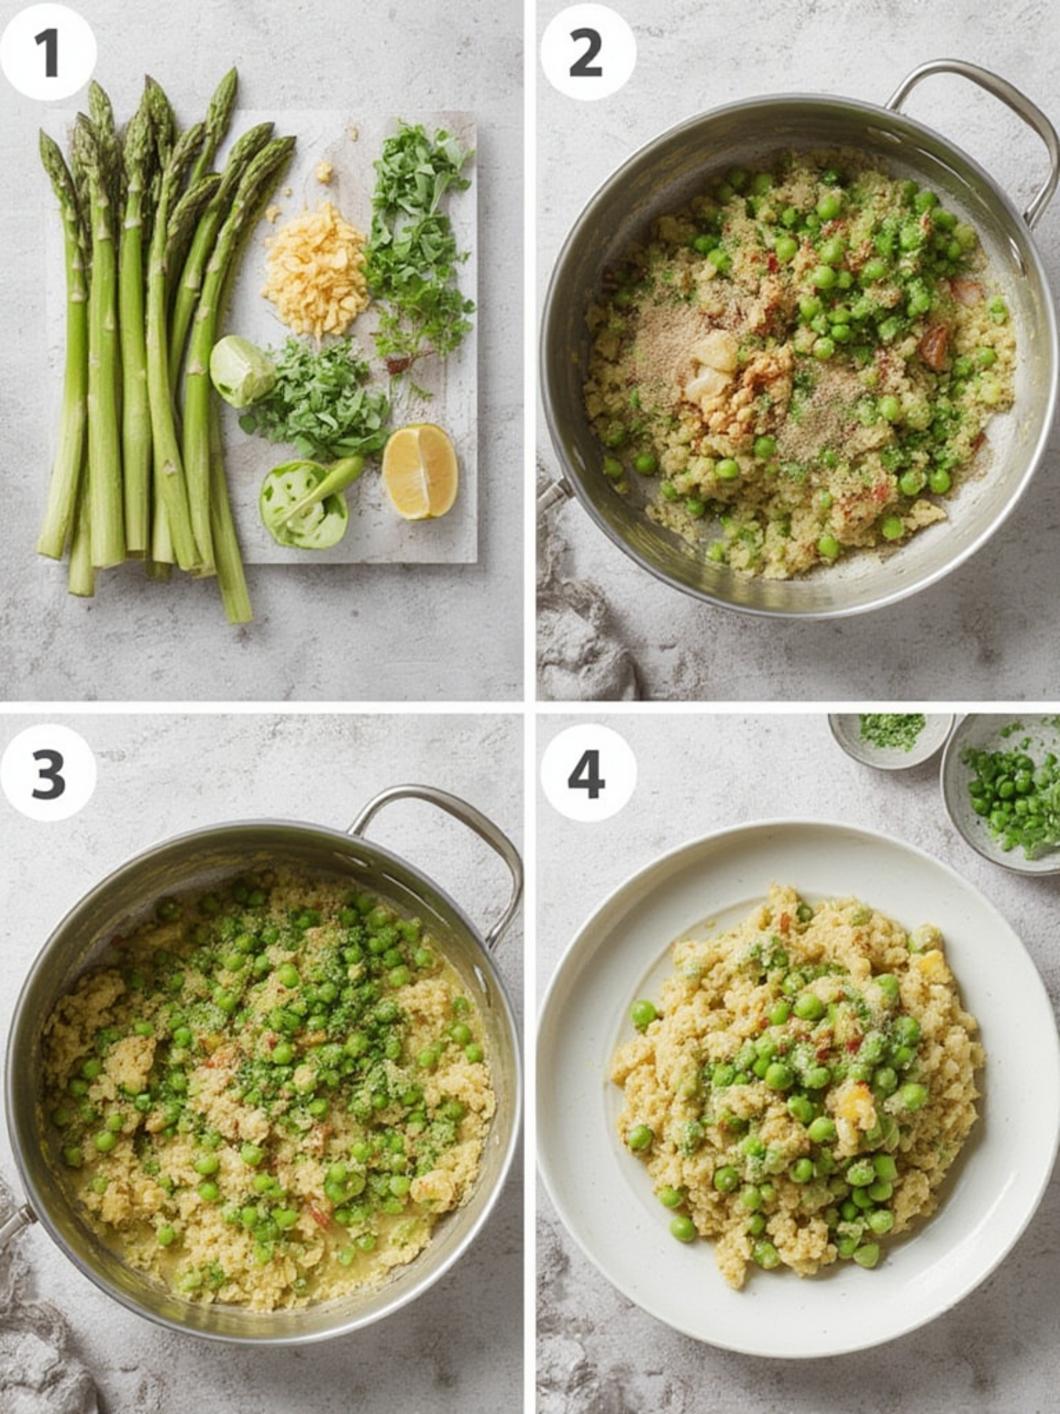
- Veggies & Herbs: 1 bunch fresh asparagus, woody ends trimmed, spears cut into 1-inch pieces (tips reserved); 1 cup fresh or frozen peas; Large handful fresh parsley, chopped; Zest of 1 lemon.
- Liquids: 4-5 cups low-sodium vegetable or chicken broth, kept warm; ½ cup dry white wine (like Pinot Grigio or Sauvignon Blanc); Optional: 1 tbsp lemon juice.
- Finishers: 3 tbsp unsalted butter; ½ cup finely grated Parmesan or Pecorino Romano cheese; Extra virgin olive oil for finishing.
- Seasoning: Kosher salt, freshly ground black pepper.
Substitutions & Notes:
- Rice: Do not substitute long-grain rice. Arborio or carnaroli are essential for their high starch content.
- Wine: Omit for a non-alcoholic version and add an extra ¼ cup broth with a splash of white grape juice or vinegar for acidity.
- Cheese: For a dairy-free version, use a high-quality nutritional yeast or a vegan Parmesan alternative.
- Peas: Frozen peas are a perfectly acceptable and convenient substitute for fresh. Add them in the last 3 minutes of cooking.
- Asparagus: If out of season, substitute with 1 cup of halved green beans or thinly sliced sugar snap peas.
Kitchen Tools & Equipment:
- Heavy-bottomed saucepan or deep sauté pan: This ensures even heat distribution, preventing scorching.
- Wooden spoon or silicone spatula: Essential for constant stirring and scraping the pan’s bottom.
- Medium saucepan: For warming your broth.
- Cheese grater: For freshly grated cheese, which melts and incorporates better than pre-shredded.
- Cutting board & sharp knife: For prepping vegetables efficiently.
- Ladle: For adding broth gradually.
Timing / Cooking Schedule (H2)
- Prep Time: 15 minutes (trimming asparagus, dicing shallot, mincing garlic, measuring ingredients).
- Cook Time: 25-30 minutes (the active stirring and building process).
- Total Time: 40-45 minutes from start to finish.
Context: This is a classic spring risotto that comes together quickly enough for a weeknight but feels elegant enough for dinner parties. The key is having all your ingredients prepped and close at hand (mise en place*) before you start the cooking sequence, as the stovetop phase requires your full attention.
Step-by-Step Instructions (H2)
1. Sweat the Aromatics: Heat 1 tbsp butter and 1 tbsp olive oil in your heavy-bottomed pan over medium heat. Add the diced shallot and a pinch of salt. Cook gently for 3-4 minutes until translucent and soft, not browned. Add the minced garlic and cook for 30 seconds until fragrant.
Tip: “Sweating” draws out flavor without caramelizing, creating a sweet, delicate base.*
2. Toast the Rice: Add the arborio rice to the pan. Stir continuously for 2-3 minutes until the edges become slightly translucent and the rice smells nutty. This toasting step is crucial for flavor and helps the grains maintain a slight bite.
Tip: Use a wooden spoon to ensure every grain is coated in the fat.*
3. Deglaze with Wine: Pour in the white wine. Stir until it is almost completely absorbed by the rice. This Adds acidity and complexity.
Tip: Let the alcohol cook off completely; you shouldn’t smell sharp alcohol when it’s done.*
4. The Stirring Ritual: Begin adding your warm broth, one ladleful (about ½ cup) at a time. Stir frequently, scraping the bottom of the pan to prevent sticking. Wait until the broth is mostly absorbed before adding the next ladle. This gradual addition and constant motion coax the starch out of the rice, creating the signature creamy texture.
Tip: Maintain a gentle, steady simmer. If it’s boiling too hard, the rice will cook unevenly on the outside.*
5. Incorporate the Vegetables: About 10 minutes into the stirring process, add the asparagus pieces (not the tender tips yet). Continue the broth addition and stirring. After about 15-18 minutes total, the rice should be al dente—tender with a firm core. Add the peas and asparagus tips now.
Tip: Taste for doneness! The total time can vary based on rice age and pan type.*
6. The Mantecatura (Creaming): Once the rice is cooked and the broth is mostly absorbed, remove the pan from the heat. Stir in the remaining 2 tbsp of cold butter, the grated Parmesan, lemon zest, and half the parsley. Vigorously stir or “whip” the risotto for 30 seconds. This emulsifies the fats and starch, creating an incredibly rich, glossy, and creamy consistency.
Critical Tip: Off-heat is key here. Overheating after adding cheese can cause it to become stringy and greasy.*
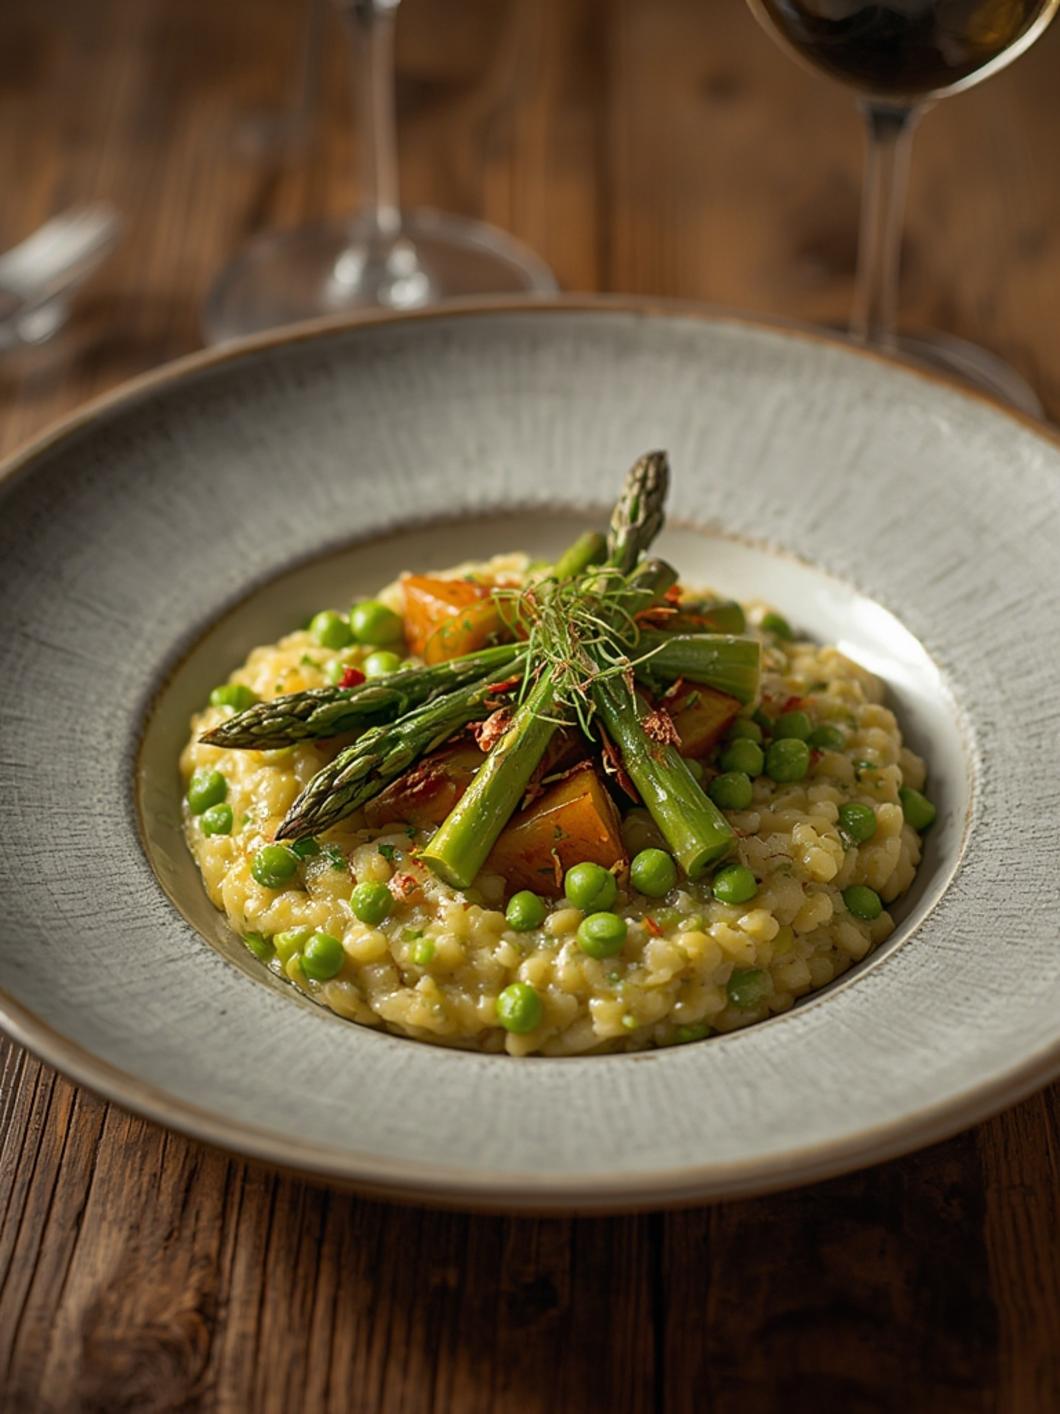
7. Final Season & Serve: Stir in lemon juice if using. Season generously with salt and pepper. Let it rest, covered, for 1 minute. Serve immediately in warmed bowls, drizzled with a touch of olive oil, and topped with the remaining parsley and extra cheese.
Nutritional Benefits / Advantages (H2)
Making this Focus keyword at home offers significant nutritional advantages. Asparagus is a powerhouse of folate, vitamins K and A, and a natural diuretic. Peas provide plant-based protein, fiber, and iron. The moderate amount of cheese adds calcium and protein, while the olive oil contributes heart-healthy monounsaturated fats. By controlling the salt and using homemade broth, you create a lower-sodium version of a typically heavy restaurant dish. It’s a balanced meal: complex carbs from rice, vitamins from vegetables, and healthy fats, all in one bowl.
Tips, Alternative Methods or Cooking Advice (H2)
For a Creamier Texture: Stir in a final ¼ cup of broth during the mantecatura step for a looser, soup-like consistency (all’onda*).
- Protein Boost: Add 8 oz of cooked, chopped chicken, shrimp, or chickpeas in step 6.
- Vegan Version: Skip the butter and cheese. Use 2 tbsp of good olive oil and 2 tbsp of vegan butter substitute, and finish with 2 tbsp of white miso paste or a larger sprinkle of nutritional yeast for umami.
- Seasonal Swap: In fall, use roasted butternut squash and sage. In winter, incorporate wilted kale and toasted walnuts.
For Beginners: The most common hurdle is the broth absorption. Remember: ladle, stir, wait, repeat*. Don’t rush. If your rice is in danger of drying out, add a little more hot broth. It’s better to have a little extra liquid than to scorch the bottom.
Common Mistakes to Avoid (H2)

1. Mistake: Not Toasting the Rice.
* Why it’s bad: You lose the nutty flavor and the rice can become gummy.
* Solution: Always toast the rice in the fat until translucent around the edges.
2. Mistake: Adding All the Broth at Once.
* Why it’s bad: You’ll end up with boiled rice, not creamy risotto. The starch needs the gradual release.
* Solution: Be patient. Add broth incrementally, waiting until mostly absorbed before the next addition.
3. Mistake: Stirring Infrequently or Too Vigorously.
* Why it’s bad: Infrequent stirring causes scorching. Over-stirring can break the grains.
* Solution: Stir often and thoroughly enough to scrape the bottom but gently.
4. Mistake: Adding Cheese Over Heat.
* Why it’s bad: The proteins in cheese seize up and become grainy when hit with high, direct heat.
Solution: Always* remove the pan from the heat before adding butter and cheese for the mantecatura.
5. Mistake: Using Cold Broth.
* Why it’s bad: It shocks the rice, halting the cooking process and leading to uneven texture.
* Solution: Keep your broth in a separate saucepan on a low simmer throughout cooking.
Storage / Maintenance Tips (H2)
Risotto is best served immediately, as it will thicken as it sits. For leftovers:
- Refrigeration: Cool to room temperature within 2 hours. Store in an airtight container in the fridge for up to 3 days.
- Reheating: The goal is to rehydrate without making it mushy. Place the risotto in a pan over low heat. Add a splash of broth or water (1-2 tbsp per cup). Stir gently and continuously until heated through and creamy again. A microwave works in a pinch—use low power, add liquid, and stir often.
- Freezing: Not ideal, but possible for up to 1 month. Thaw overnight in the fridge and reheat as above, adding a little more liquid as it may be drier.
- Safety: Discard if left at room temperature for more than 2 hours or if it has an off smell.
Conclusion (H2)
Mastering this Focus keyword is about embracing a simple, rhythmic process. The reward is a dish that’s infinitely greater than the sum of its parts: creamy, vegetable-packed, and bursting with the bright essence of spring. It’s a versatile template that teaches fundamental cooking techniques applicable to countless dishes. We’ve demystified the process, highlighted potential pitfalls, and explored ways to make this spring risotto your own. Now, grab your pan and experience the magic of homemade Italian comfort food.
Have you made this risotto? What was your favorite variation? Share your experience in the comments below, and don’t forget to check out our other seasonal vegetable guides!
FAQs (H2)
1. Can I make risotto without wine?
Yes! Simply omit the wine and add an extra ¼ cup of warm broth when you would normally add it. For acidity, stir in a teaspoon of lemon juice or white wine vinegar with your final butter and cheese.
2. My risotto is too thick/gluey after resting. What happened?
This usually means you over-stirred after adding the cheese, or you didn’t add enough final broth during the mantecatura. To fix it, reheat gently in a pan with a few tablespoons of warm broth, stirring until it loosens.
3. How do I know when the rice is perfectly cooked (al dente)?
Bite into a grain. It should be tender but still offer a slight, satisfying resistance in the center—not hard, but definitely not mushy. It will continue to cook slightly from the pan’s residual heat.
4. Can I use a different type of rice?
Only high-starch, short-grain rices like arborio, carnaroli, or vialone nano will create the classic creamy texture. Basmati, jasmine, or brown rice lack the necessary starch and will not work.
5. Is stirring constantly really necessary?
Yes and no. You must stir frequently to prevent sticking and to release starch, especially when adding new broth. However, you don’t need to stir without pause for 20 minutes. A steady, rhythmic stirring after each broth addition is sufficient. The key is not to walk away for more than a minute at a time.