Last Thanksgiving, I was hosting a large family gathering and needed a showstopping dessert that wouldn’t require valuable oven space. That’s when I discovered this incredible pumpkin delight dessert—a no-bake wonder that layers everything we love about fall into one spectacular dish. The reaction from my guests was overwhelming, and now this recipe has become a non-negotiable part of every autumn celebration at my house.
Why You’ll Love This No-Bake Pumpkin Dessert
Pumpkin delight is one of those magical recipes that looks incredibly impressive but comes together with surprising ease. No baking means no heating up your kitchen, and the make-ahead nature makes it perfect for busy holiday seasons when oven space is at a premium.
The layers create visual drama and textural variety. From the crunchy base through the creamy pumpkin center to the fluffy topping, every bite offers something different. It’s like having pumpkin pie, cheesecake, and mousse all in one dessert.
Understanding the Layers of Pumpkin Delight
This layered pumpkin dessert typically consists of four distinct layers, each contributing unique flavor and texture. The bottom layer provides crunch and structure, the cream cheese layer adds tang and richness, the pumpkin layer delivers that essential autumn flavor, and the whipped topping creates a light, airy finish.
The genius of this dessert lies in how these layers complement each other. The mild sweetness of the whipped topping balances the spiced pumpkin, while the cream cheese layer prevents the dessert from becoming too sweet.
Essential Ingredients for Pumpkin Delight
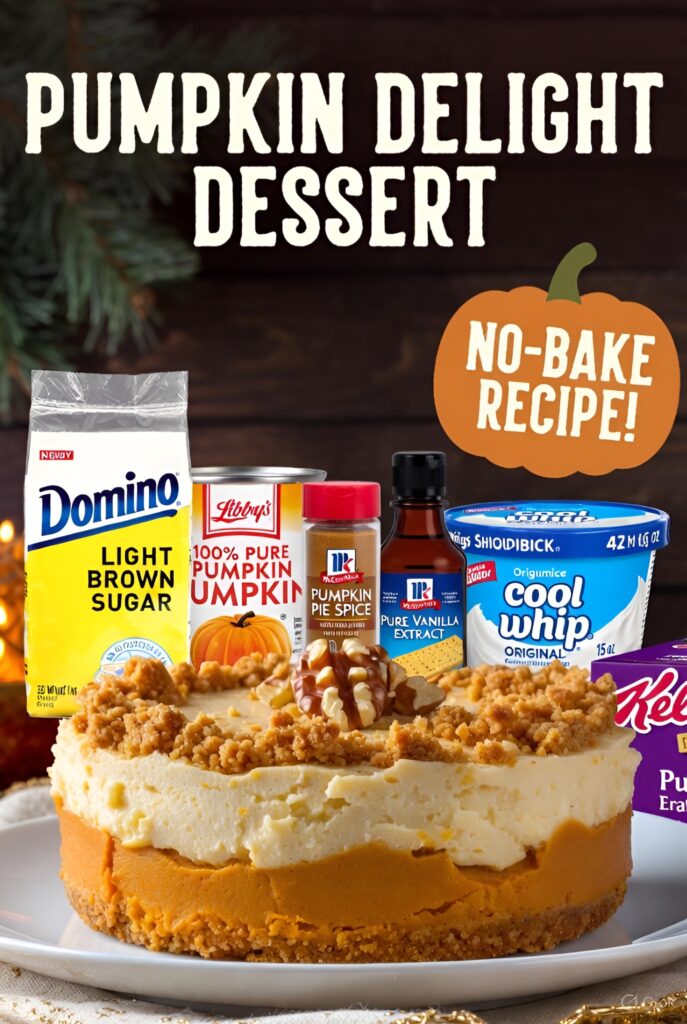
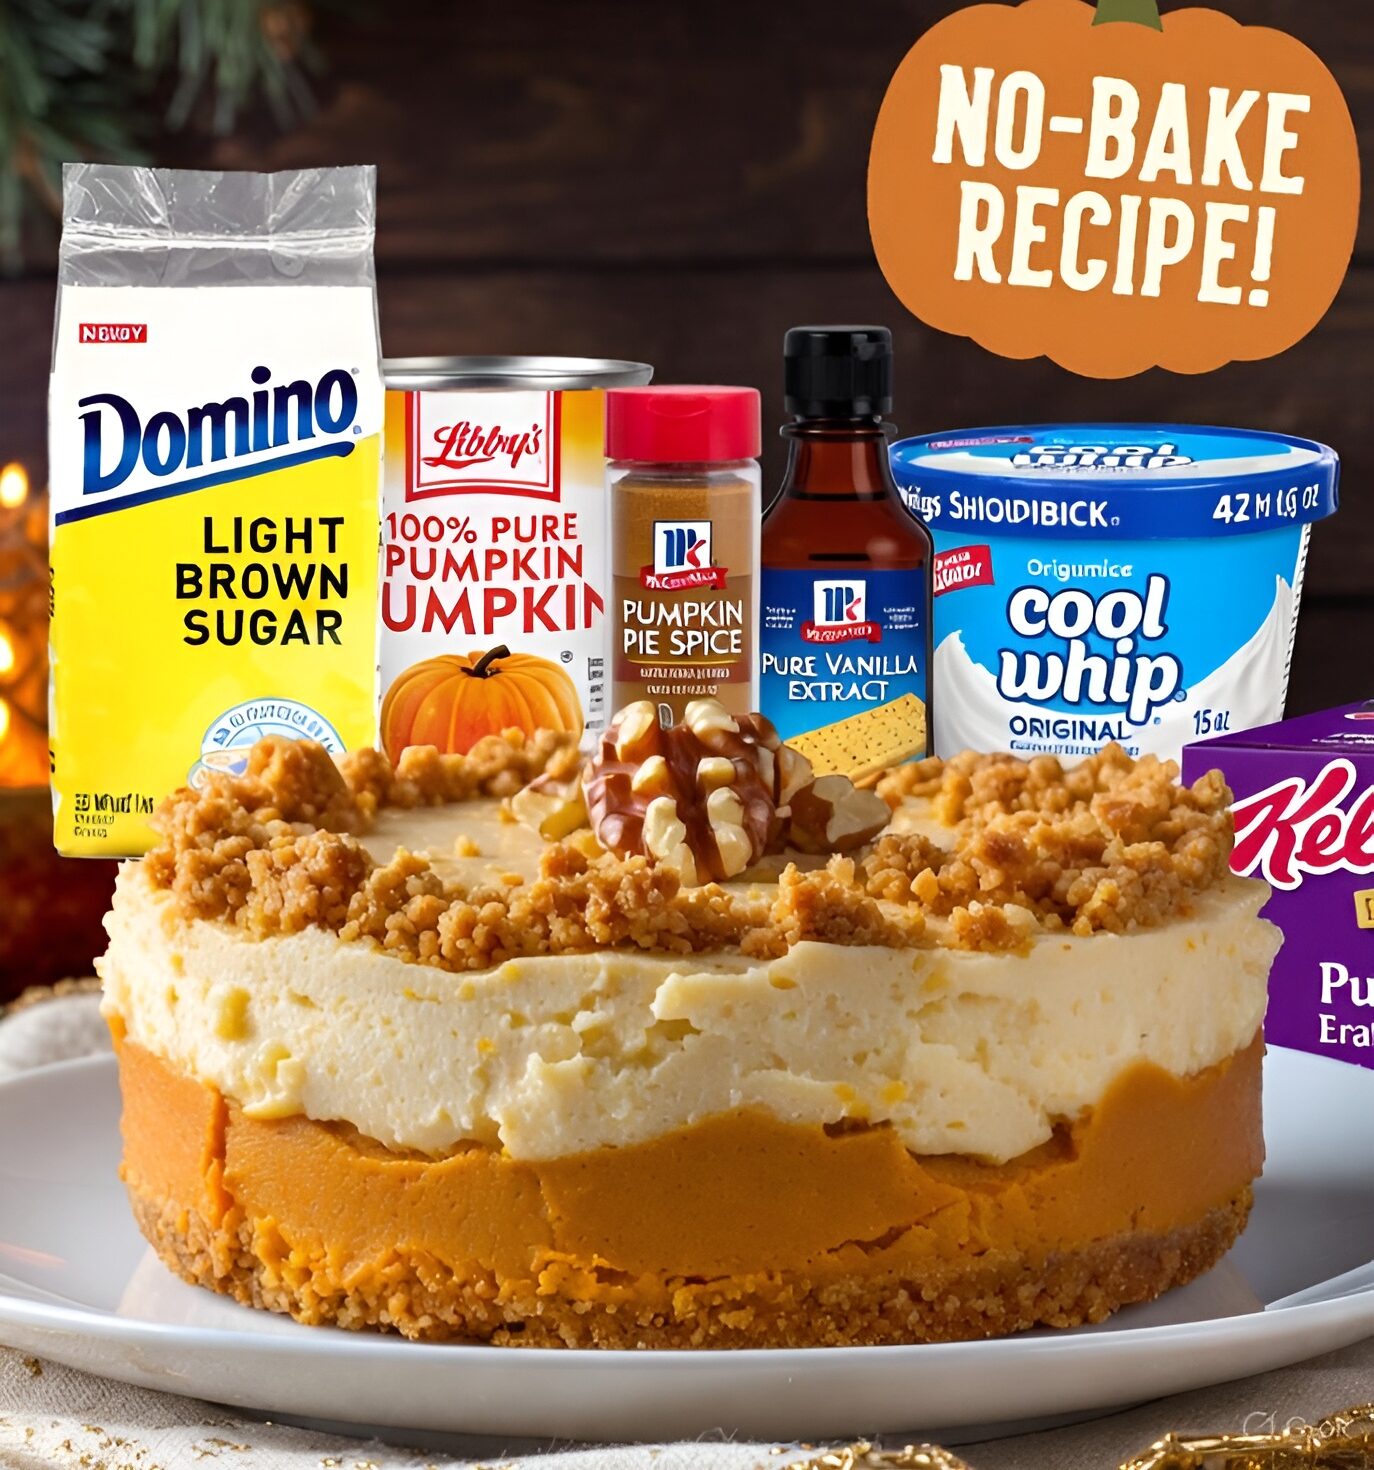
Based on the image, here are the ingredients you’ll need:
- Domino light brown sugar
- Libby’s 100% pure pumpkin
- McCormick pumpkin pie spice
- Pure vanilla extract
- Cool Whip (original)
- Additional ingredients for the crust and cream cheese layer
The specific brands shown are popular choices, but you can substitute with your preferred brands. However, I strongly recommend using pure pumpkin (not pumpkin pie filling) so you can control the sweetness and spice levels yourself.
Step-by-Step Instructions for Making Pumpkin Delight
Preparing Your Pan
Start with a 9×13-inch baking dish. While you could use a glass or ceramic dish, I prefer clear glass for this recipe because it beautifully showcases the layers from the sides.
Some recipes call for lightly greasing the pan, but I find that unnecessary if you’re planning to serve directly from the dish. If you want to turn it out for presentation, line the pan with parchment paper for easy removal.
Creating the Crust Layer
The base typically consists of crushed graham crackers or vanilla wafers mixed with melted butter and sugar. The mixture should resemble wet sand and hold together when pressed.
Press this mixture firmly into the bottom of your prepared pan, creating an even layer. Use the bottom of a measuring cup or glass to really compact it—this prevents the crust from being crumbly when you serve the dessert.
Refrigerate the crust while you prepare the next layer. This helps it firm up and makes it easier to spread the cream cheese layer on top without disturbing the base.
Making the Cream Cheese Layer
The cream cheese layer typically combines softened cream cheese, powdered sugar, and a portion of the Cool Whip. Beat the cream cheese until it’s light and fluffy before adding other ingredients.
The key to a smooth cream cheese layer is ensuring the cream cheese is truly at room temperature. Cold cream cheese will be lumpy no matter how long you beat it. Plan ahead and leave it out for at least an hour before starting.
Fold in the Cool Whip gently to maintain its airy texture. Spread this mixture evenly over the chilled crust layer, smoothing the top with an offset spatula.
Preparing the Pumpkin Layer
This is where your no-bake pumpkin dessert gets its signature flavor. Combine the pure pumpkin puree with brown sugar, pumpkin pie spice, and vanilla extract. The brown sugar adds depth and molasses notes that complement the pumpkin beautifully.
Mix these ingredients thoroughly until smooth and evenly combined. Taste and adjust the spices if needed—some people prefer more cinnamon, others want extra ginger or nutmeg.
Carefully spread the pumpkin mixture over the cream cheese layer. Take your time with this step to avoid disturbing the layer beneath. Start from the center and gently spread outward.
Adding the Final Whipped Topping Layer
The top layer of Cool Whip creates that signature cloud-like appearance. Spread it evenly over the pumpkin layer, creating swirls or peaks if you’d like a more decorative look.
For an elegant finishing touch, sprinkle the top with a mixture of crushed graham crackers, chopped pecans, or a dusting of pumpkin pie spice. This adds visual appeal and hints at what’s beneath.
Chilling to Perfection
Here’s where patience becomes crucial. Cover your pumpkin delight dessert with plastic wrap and refrigerate for at least 4 hours, though overnight is even better. This chilling time allows all the layers to set properly and the flavors to meld together.
The longer it sits, the easier it becomes to cut clean slices. I usually make this the day before I plan to serve it, which also helps spread out the holiday cooking workload.
Nutritional Information
Per serving (based on 12 servings):
- Calories: 320
- Total Fat: 16g
- Saturated Fat: 10g
- Cholesterol: 35mg
- Sodium: 180mg
- Total Carbohydrates: 42g
- Dietary Fiber: 2g
- Sugars: 32g
- Protein: 4g
Creative Variations for Your Pumpkin Dessert
Gingersnap Crust Pumpkin Delight
Replace the graham cracker crust with crushed gingersnap cookies. The spicy ginger flavor intensifies the autumn taste and adds extra crunch to every bite.
Maple Pumpkin Delight
Replace some of the brown sugar with pure maple syrup in the pumpkin layer. The maple adds complexity and creates a more sophisticated flavor profile perfect for adult palates.
Chocolate Pumpkin Delight
Add chocolate chips to the crust layer or drizzle melted chocolate over the final whipped topping. The combination of chocolate and pumpkin is surprisingly delicious and adds visual drama.
Individual Pumpkin Delight Cups
Layer the components in clear glasses or mason jars for individual servings. This presentation is perfect for dinner parties and allows guests to see all the beautiful layers.
Tips for Perfect Pumpkin Delight Every Time
Use full-fat ingredients for the richest flavor and best texture. Light cream cheese and reduced-fat Cool Whip can work in a pinch, but the full-fat versions create a more luxurious dessert.
Don’t skip the chilling time. I know it’s tempting to dig in early, but properly chilled pumpkin delight slices cleanly and tastes significantly better than under-chilled versions.
For the cleanest slices, dip your knife in hot water and wipe it clean between each cut. This prevents the layers from smooshing together and creates professional-looking servings.
Make-Ahead and Storage Tips
This no-bake pumpkin dessert is an excellent make-ahead option. Prepare it up to 2 days in advance and keep it covered in the refrigerator. The flavors actually improve with time as they meld together.
Store leftovers covered in the refrigerator for up to 4 days. The crust may soften slightly over time, but the dessert remains delicious. I find that it tastes best within the first 3 days.
While you can freeze this dessert, I don’t generally recommend it. The Cool Whip and cream cheese can separate when thawed, affecting the texture. If you must freeze it, thaw in the refrigerator overnight.
Serving Suggestions for Fall Gatherings
Serve pumpkin delight chilled on dessert plates with a dollop of additional whipped cream and a sprinkle of cinnamon. A few candied pecans on top add elegance and extra crunch.
For buffet service, cut the dessert into squares in the pan and let guests serve themselves. Provide a pie server or large spatula to make serving easier.
Pair each serving with a small glass of dessert wine, apple cider, or spiced coffee for a complete autumn dessert experience.
Perfect Occasions for This Layered Dessert
Pumpkin delight is ideal for:
- Thanksgiving dinner
- Friendsgiving celebrations
- Halloween parties
- Fall potlucks
- Harvest festivals
- Autumn birthday celebrations
- Any gathering during September through November
Pairing Recommendations
This rich pumpkin dessert pairs beautifully with:
- Spiced chai lattes
- Apple cider (hot or cold)
- Pumpkin spice coffee
- Caramel-flavored hot chocolate
- Harvest-blend herbal teas
The beverage should complement rather than compete with the pumpkin spice flavors. Warm drinks are particularly nice with this chilled dessert.
Presentation Ideas for Maximum Impact
For a stunning presentation, garnish the dessert just before serving. Create a decorative pattern on top using cinnamon or cocoa powder through a stencil, or arrange candied pecans in a geometric pattern.
Serve on white plates to make the warm orange color of the pumpkin layer pop. Add a small mint leaf or a cinnamon stick as an edible garnish.
For holidays, pipe additional whipped cream around the edges or use themed cookie cutters to create decorative shapes from graham crackers to place on top.
Troubleshooting Common Issues
If your layers are mixing together, you’re likely spreading each layer too vigorously. Use a gentle hand and patience when layering, and make sure each previous layer is well-chilled before adding the next.
If the dessert is too soft to slice, it hasn’t chilled long enough. Return it to the refrigerator for another hour or two. The cream cheese and Cool Whip need adequate time to firm up.
If the crust is too crumbly, you didn’t add enough butter or didn’t press it firmly enough. The mixture should hold together when pressed, and the layer should be very compact.
Why This Recipe Works for Busy Cooks
The no-bake aspect makes this pumpkin dessert perfect for busy holiday schedules when your oven is dedicated to the turkey, stuffing, and casseroles. You can prepare it a day ahead, freeing up time on the actual holiday.
The ingredients are straightforward and widely available. No specialty items or unusual equipment required—just basic mixing bowls and a 9×13 pan.
It feeds a crowd generously. One pan easily serves 12-15 people, making it economical for large gatherings. You can even make two pans for extra-large crowds.
The Science Behind the Layers
The cream cheese layer acts as a barrier between the moist pumpkin and the crust, preventing sogginess. This middle layer is crucial for maintaining the distinct texture of each component.
The cold temperature firms up the butter in the crust and the cream cheese in the filling, creating stable layers that hold together when cut. This is why adequate chilling time is non-negotiable.
The Cool Whip contains stabilizers that help it maintain structure even after days in the refrigerator, making it ideal for make-ahead desserts unlike regular whipped cream which can deflate.
My Personal Cooking Tip
The secret to the most beautiful pumpkin delight is all about temperature control and patience. Before you even start assembling, make sure your cream cheese has been at room temperature for at least an hour—this is absolutely non-negotiable for smooth, lump-free layers. When spreading each layer, use a small offset spatula (it’s worth buying one specifically for this!) and work from the center outward with gentle, sweeping motions. Never press down hard or you’ll disturb the layer beneath. Here’s my favorite trick: after spreading each layer, I actually refrigerate the dish for 15-20 minutes before adding the next layer. Yes, this means the whole process takes longer, but the extra chilling time between layers ensures each one sets up slightly before you add the next, resulting in cleaner, more distinct layers that look stunning when you cut into them. Your patience will be rewarded with a dessert that looks professionally made!